Showing posts with label Christmas. Show all posts

July 24, 2026

Jolly Snowman

Hello there.  It's still Christmas in July, and I have a CAS (clean and simple) Christmas card to share using an oldie, but goodie stamp from Purple Onion Designs (POD).   For those not familiar with this cutie, meet Jolly (snowman looking up).  


Jolly was stamped with Memento Tuxedo Black ink on X-Press It paper, coloured with Copic Sketch markers then masked.  Ink blended Water Hyacinth fresh dye ink from Altenew (ALT) then die cut the panel down with the Blanket Stitched Rectangle from Pinkfresh Studio (PFS) for a decorative edge.  

Copic markers used:
carrot nose - YR12/16/23/27, E08 
scarf/pocket - B60/63/66 
twig arms - E31/25/29 
buttons - N7 
snow/shading - B0000/000/00, C00/0/1


And I couldn't think of a more appropriate greeting wish (retired Poppy Stamps) from Jolly. 😉  It was black heat embossed using Versafine Onyx Black ink and clear glitter embossing powder for a bit of sparkle.  Adhered the panel onto a white card base then added falling snow with a white gel pen to finish. 

Please note compensated affiliate links are used in this post at no extra cost to you should you make a purchase through them.  I appreciate your support.  Thank you for stopping by. 


Challenges:
Simply Clean & Simple - AG CAS + optional Birthday (creative licence - Jesus' birthday? 😁)

February 13, 2026

Guest Designer for 52 Christmas Card Throwdown February 2026 Colour Challenge - Gold & Black

Hello everyone.  I’m excited to be guest designing (GD) at 52 Christmas Card Throwdown (52CCT) for their GOLD & BLACK colour challenge. 


One of the designs in the Whimsy Stamps (WS) Champagne slimline paper pack was the starting point for my card.  I used a silhouette stamp set and a holy star die (unfortunately, both are discontinued/unavailable) to create this nativity scene.


The pattern paper was trimmed down to 4.25”.  Stamped the images with Versafine Onyx Black ink then heat embossed with clear glitter embossing powder.  Stamped the sentiment on a A2 size black panel with VersaMark ink next and heat embossed with gold embossing powder.  Die cut the star from gold glitter paper, then assembled the card onto a black card base to finish. 


I want to thank the 52CCT team for having me GD.  Please note affiliate links were used when possible in this post, so if you click on a link or two, I will get a small compensation at no extra cost to you… your support is appreciated.  Thank you for dropping by. 

January 09, 2026

Guest Designer for 52 Christmas Card Throwdown January 2026 Colour Challenge - Kraft, Green, Gold

Hello everyone and happy new year!  It’s my first post this year and I’m excited to be a guest designer (GD) at 52 Christmas Card Throwdown (52CCT) for their Colour Challenge this month.


I was going in a different direction when I remembered my new Snowbell Bouquet dies, purchased in my latest order from Simon Says Stamp (SSS), would be perfect for these colours.  Plus, I LOVE snowdrops!


The snowbell stems and blossoms were die cut from green and white cardstock, respectively. Ink blended  Rustic Wilderness distress ink (DI) on the stems to give them dimension.  Trimmed watercolor paper to a 3.5” square and ink smooshed diluted Rustic Wilderness DI.  To complete the snowy background, splattered with diluted white gouache paint.  Adhered this piece onto white then matted it onto kraft.  Arranged and glued the snowbells on then added more white splatters.  Adhered the gold foil die cut Joyeux Noel sentiment to finish.  


A big thank you to the 52CCT team for giving me this GD opportunity.  Ready to join in the fun?  For more inspirations and to link up your entry head to the challenge post HERE. BHope to see you in the falkery! 
For easy reference, SSS products used to make my card are linked below. Please note that affiliated links have been used in this post at no extra cost to you.  I appreciate your support.  Thank you for stopping by. 


Challenges:
Vesela Hiska - #74 Ringing Bells (thanks Majda for the suggestion!) 


October 19, 2025

CASE Me A Christmas Card 2025

Hello there.  I’m excited to be back as a guest for Michelle Lupton’s CASE Me A Christmas Card 2025 series.  A big change this year.  There are 10 hops in October - two on YouTube (YT) and eight on Instagram (IG) - where hop participants will CASE (Copy And Selectively Edit) cards from fellow crafters. 


Today I’m in IG Hop 7 with this card. To see the card I CASEd and hop along, head on over to my IG post HERE.


This year, anyone can join in the fun with your own CASEd card and be eligible for a prize from one of the many generous sponsor!  Don’t miss out and be sure to check it out.  Thank you for stopping by. 


Challenges:

November 07, 2024

Warm Cozy Wishes

Hello there.  I’m quickly popping in to share a fun and easy cocoa themed Christmas/Winter card created with Hug in a Mug stamp and cut and Nesting Oval Infinity dies from Hero Arts.


The Santa/elves cups were die cut from red/green cardstock while the cocoa was die cut from Kraft cardstock.  They were then ink blended with distress inks (DI).  The sweet toppings were die cut from X-Press It paper and coloured/shaded with Copic Sketch markers.  

DI used:
greens - Mowed Lawn/Lucky Clover, Black Soot 
red - Lumberjack Plaid, Black Soot
brown - Gathered Twigs
Copic markers used:
reds - R05/27/46
whites - C00/1, 0


Used an oval infinity die to die cut the belts from black glossy paper.  The curve of the oval matched the curve of the cup bottoms nicely.  Next, trimmed squares of black glossy and gold foil papers to create the buckles.  Adhered all the cup/topping layers onto an A2 sized Bristol panel then black heat embossed the sentiment.  Mounted the panel to a white card base to finish.  

Please note that affiliate links were used in this post when possible at no extra cost to you.  I appreciate your support.  And that’s it for my card.  Thank you for stopping by. 

September 13, 2024

Guest Designer for 52 Christmas Card Throwdown September 2024 Colour Challenge - Monochrome

Hello everyone.  I’m excired to be back as a guest designer (GD) at 52 Christmas Card Throwdown (52CCT) for their September MONOCHROME colour challenge. 

*affiliate links were used in this post when possible at no extra cost to you*

A piece of Blurry Flurries pattern paper from Whimsy Stamps (WS) was in my stash and it determined the monochromatic colour for my card. 


This card came together quite easily.  Hill masks were hand cut from masking paper  and adhered to specific areas on the panel before stamping the trees from Inkydinkado Woodland Wonderland stamp set with Dusk dye ink.  Used a finger blending brush to swipe over the masks to create the slopes and add shading under the trees.  Splattered with diluted white gouache paint for an even more snowy wintry look.  


The WS Let It Snow sentiment was die cut twice from scraps of white cardstock and once from white glitter paper to stack for dimension.  Used the negative cutout to help with alignment when assembling the card onto a white card base to finish.


I want to thank Andreja and the 52CCT team for this GD opportunity.  For inspirations from the design team and/or link up your entry, click HERE.  Hope to see you in the gallery.  Thank you for stopping by.


Challenges:


April 24, 2024

Guest Designer Reminder for Christmas Craft Creations April 2024 Challenge - Non-Traditional Colours

Hello there.  I’m back today to share my guest designer (GD) reminder card for Christmas Craft Creations (CCC) April challenge - Non-Traditional Colours.

please note: affiliate links were used in this post when possible at no extra cost to you… thank you!

I am loving layering stencils lately, so I pulled out the new Festive Poinsettia stamp and stencil sets from Alex Syberia Designs (ASD) to create my card.  I wanted to use it this past Christmas, but my order didn’t arrive in time.  Anyway, here’s my card. 


On Bristol paper, the poinsettia image was stamped with Fade Out ink for a no-line colouring look.   Next, coloured the image with two gradient colours of dye inks each in turquoise and grays using blending brushes.  Die cut the image out with an A2 Stitched Rectangle Set 1 die from My Favorite Things.  For some sparkle, applied clear shimmer to the poinsettia flower petals and for a bit of texture, splattered with diluted white gouache paint. 


Joyful by CZ Designs from Simon Says Stamp (SSS) was die cut from black glitter paper and its shadow from regular white cardstock.  Assembled the card onto a white card base, then added clear jewels from Memory Box to the poinsettia’s center to finish.


I would like to thank Charlotte and the CCC teams for having me GD.  For more inspirations and to link up your entry, please click HERE.  Thank you for stopping by.  


Challenges:
SSS Flickr - #222 April AG (SSSFlickrChallenge#222)


April 10, 2024

Guest Designer for Christmas Craft Creations April 2024 Challenge - Non-traditional Colours


Hello everyone.  I’m excited to be guest designing (GD) at Christmas Craft Creations (CCC) this month for their April Non-Traditional Colours challenge.  

*please note: affiliate links used in this post when possible at no extra cost to you… thank you!

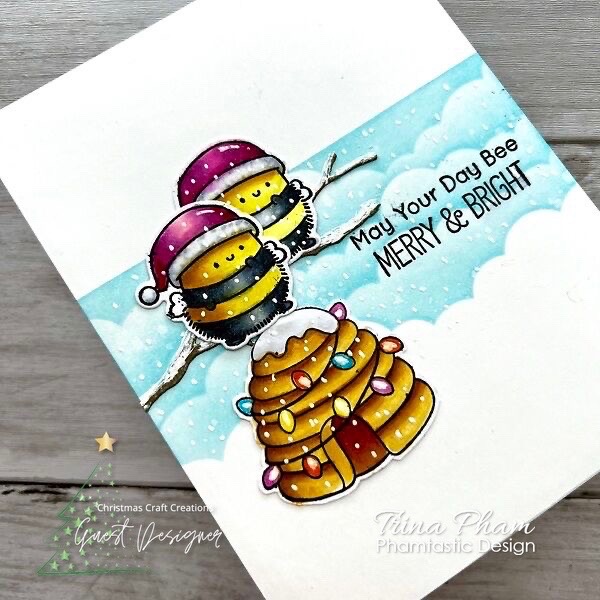
Non-traditional colours to me means not red/green or red/gold.  I then remembered never before used (NBUS) Merry Bees-mas stamp and dies from My Favorite Things (MFT) and NBUS Bee Merry stamp from Clearly Besotted and inked them up for my card.  Let me introduce you to twin bees, Merry and Bright. 😂*lol*


The images were stamped with Memento Tuxedo Black ink on X-Press It paper and coloured with Copic Sketch markers.  The bees were die cut out with the matching die.  There is no die available for the beehive, so it was fussy cut out.  

Copic markers used:
yellows - Y11/13/15, V01 
blacks - C3/5/7/9 
pinks - RV10/63/55/09 
beehive - Y21, YR21/23/24/27 
lights - BG05, RV06, Y06, YR07 
shading - C00/1/3 


Next, masked the upper portion of an A2 size Bristol panel and ink blended Salvaged Patina distress ink over NBUS slimline cloud stencil (retired from MFT).  Lightly splattired with water and dabbed with a paper towel.  The Woodland Branch from Memory Box was die cut from brown cardstock.  Stamped the sentiment in black directly onto the panel, then assembled the card.  Added snow details with a white gel pen to finish.


I want to thank Charlotte and the CCC design team (DT) for this GD opportunity.  For inspirations from the DT and to link up your entry, please click HERE.  Thank you for stopping by. 


Challenges:
NBUS #61 - new stamps/dies/stencil