Showing posts with label Poppy Stamps. Show all posts

November 16, 2024

Just A Note To Say

Hello there.  Taking a brief break from Christmas cards today to share a super easy thank you card that was commissioned for a piano teacher.

*affiliate links used in this post when possible at no extra cost to you*

The piano keys were created with strips of paper trimmed from black and white scraps.  The alcohol ink background is Inked Oasis pattern paper from Pink and Main.  


The Musical Notes (retired My Favorite Things) were die cut from black cardstock.  The sentiment (retired Poppy Stamps) was white heat embossed onto black cardstock.  Added the three dots with a white gel pen and stamped “thank you” on the inside (forgot to take a photo of it).  Assembled the card onto a split black/white card base to finish. 


And that is all for this card!  Thank you for stopping by.  


September 13, 2023

Guest Designer for Time Out Photo Inspiration Challenge #24 - Fall Camping


Hello everyone.  I’m excited to be guest designing this fortnight at Time Out (TO) for their photo inspiration challenge #247.


I must admit I struggled a little with this one since I don’t have anything shown in the foreground.  So I focussed on the fall colours and the scene behind the foreground and tried to re-create that view through the opening. 😉  Here’s my CAS (clean and simple) card.


The Birch Tree Window (retired Simon Says Stamp die) was die cut from a stitched white woodgrain panel in my stash and shading added to it with residual Black Soot distress ink (DI) remaining on a detail blending tool.  Gathered Twigs, Rusty Hinge, Speckled Egg, Iced Spruce and Tumbled Glass DIs were then ink blended with blending brushes on Bristol paper to create the scene behind the window.  A white gel pen was used to add ripples on the water.


The sentiment was foiled on black cardstock using Spellbinders White Opaque hot foil and Poppy Stamps Modest Greetings 1 hot foil plate.  It was die cut out with the included sentiment strip die and trimmed shorter.  Mounted the panel onto two pieces of thick white paper for a bit of dimension and assembled the card onto a white card base to finish.


This challenge is sponsored by Lawn Fawn, and the winner will receive a $25 gift card to their store as well as an invitation to GD on a future TO challenge.  To qualify, make sure to follow the challenge rules located on the right-hand sidebar of the TO challenge blog.  For inspirations from the design team and/or link up your project, click HERE.  

I want to thank Stephanie and the TO team for having me GD.  Affiliate links have been used when possible at no extra cost to you.  Thank you for stopping by.  Have a wonderful day.


Challenges:

March 29, 2022

Guest Designer for ATSM #426 - Make Your Mark


Hello everyone.  I’m so excited to be guest designing (GD) at Addicted to Stamps and More (ATSM) today for their challenge #426 - Make Your Mark.


Tomorrow happens to be my eldest nephew’s birthday.  I have no clue how 22 years flew by so quickly!  So for my GD card, I used a few stamp sets from Gerda Steiner Designs (GSD) to create this fun mini slimline birthday card for him.


All images were stamped with Memento Tuxedo Black ink and coloured in with Copic Sketch markers.  Started by trimming a mini slimline panel (3.25”x6.25”) from Xpress It cardstock.  The floating puppy is from Howl Are You? Puppy and he was stamped first.  Masked him, then stamped the balloon from Lovely Panda.  For the wall, Shabby Shutters distress ink was blended on with a blender brush in the upper 2/3 of the panel.  Repeated the stamping steps for the two puppies below on a separate scrap piece of Xpress It cardstock, then fussy cut them out.  The left puppy, also from Howl Are You? Puppy, was stamped first, masked, then stamped the puppy in the gift bag from Christmas Puppies.  


The floor was created with new/unused Wood Floors die from Penny Black.  The wood floor section was die cut from Kraft cardstock, then coloured with Gathered Twigs distress ink and a foam blending tool.  The baseboard was die cut twice from a scrap of thick white cardstock and glued together to give it dimension.  The sentiment from Birthday Blowout by Poppy Stamps was heat embossed on black cardstock with white embossing powder.  Assembled the card onto a white 3.25”x6.25” card base, then added shading below the puppies on the floor and drew a bow on the tail with a fine black pen to finish.

This may be a little too cute for a 22 year old, but it’s fun, too. 😉 


I want to thank Kylie and the ATSM team for this GD opportunity.  For more inspirations from the design team and/or link up your own card to the gallery, please click HERE.  Thank you for stopping by.  Have a wonderful day.


Challenges:
NBUS #36 - new wood floor die

February 04, 2022

Guest Designer for The Flower Challenge #65 - Occasions


Hello everyone.  I’m excited to be back as a guest designer (GD) this month at The Flower Challenge (TFC) for their OCCASIONS challenge.


I was looking through my increasing stash of new (NBUS) floral products and decided to finally ink up the Togetherness Flower Bouquet stamp set from Hero Arts to create this birthday card for a friend whose birthday is next week.


This was pretty straight forward.  The bouquet was stamped with Memento Tuxedo Black ink on Xpress It cardstock, coloured with Copic markers and then fussy cut out since I don’t have the matching die.  The trellis background is the Lattice Plate from Poppy Stamps.  It was die cut twice from Bristol paper and stacked for dimension.  


Using a blender brush next, blended Picked Raspberry distress ink directly on the white card base at an angle from the bottom left corner.  The sentiment from Waffle Flower Essential Sentiments was then heat embossed on Bristol paper with Liquid Platinum embossing powder and fussy cut out… once again, I don’t have that matching die.  Assembled the card and added clear shimmer on the flowers to finish. Sorry, couldn’t capture the sparkle in the photos.

I want to thank Viv and TFC design team (DT) for having me GD this month.  To link up your card and/or to see what the DT have created to inspire you, click HERE.  Thank you for stopping in.  Hope to see you in the gallery.


May 25, 2021

Bouquet of Daisies

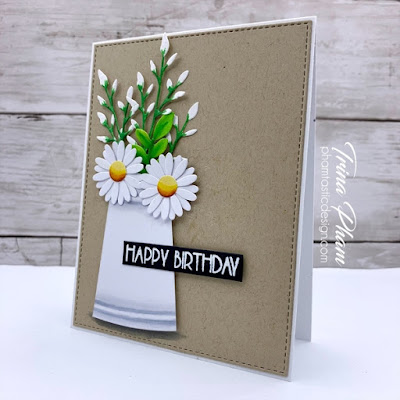
Hello there.  Popping in quickly to share a birthday card of fresh daisies made entirely of die cuts.  I used never before used (NBUS) Spring Bouquets from Honey Bee Stamps (HBS) and NBUS Daisy Stems from Memory Box (MB). 


All pieces were die cut from scraps of Xpress It cardstock, except for the daisy centres which were from a scrap of yellow cardstock.  Coloured and/or shaded them in with Copic markers (G46, YG07, BG05, YG06, YG03, YG01, YR16, Y17, Y02, Y000, C3, C1, C00).  


The daisies were doubled up to make them fuller.  Stretched the watering can and turned it into a vase.  White heat embossed the sentiment from Poppy Stamps Birthday Blowout on black cardstock then trimmed it to a strip.  Luckily the stitched Kraft panel attached to a white card base was already in my stash.  Added shading to it to ground the vase.  Popped the bouquet and vase up with foam tape for some dimension.  Added clear shimmer to the daisy centres for a bit of sparkle to finish.


Thank you for dropping by.  Have a wonderful day.


Challenges:

May 07, 2021

First Birthday

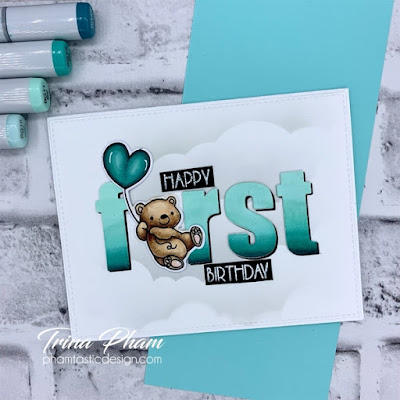
Hello everyone.  My youngest nephew, Cohen, turns ONE next week!  Wow, time flies!  I decided to stretch a never before used (NBUS) Valentine stamp set from Mana Elephant (ME) called Up With Love to create his card.

Started by stamping the image with Memento Tuxedo Black ink on a scrap of X-Press It cardstock and coloured it with Copic markers (BG49, BG13, BG11, BG10, E25, E33, E31, E30, R30).  Added highlights to the balloon with a white gel pen, then took the matching die and die cut it and a scrap of thick white cardstock to stack them for support.


The same BG markers were then used to ombré colour a scrap of X-Press It cardstock before die cutting the Altenew (ALT) Bold Alphabet letters from it.  The letters were die cut again from a scrap of black cardstock to offset for a drop shadow.  Created a cloud background on a stitched Bristol panel from my stash using a blender brush, gray dye ink and the cloud edge stencil from Honey Bee Stamps (HB) Outdoor Scene Builder.


White heat embossed the sentiment from Birthday Blowout stamp set by Poppy Stamps (PS) and assembled the card to finish.  Thank you for dropping by.  


Challenges:


September 15, 2020

CAS Christmas September Reminder - Christmas Tree

Hello there.  This is the reminder post for this months Christmas Tree challenge at CAS Christmas.


My favourite Christmas tree was a large white Christmas tree that one of my high school friend’s family had. It just looked so elegant decorated with gorgeous blue ornaments and lights.  That memory and this card by Loll inspired my card. 


Mixed media (MM) paper was used to create my card.  New NBUS Cottage Window from Poppy Stamps was die cut twice and the tree (unknown) once.  Traced the window onto a scrap piece and fussy cut it out for the backing.  Blended Blueprint Sketch distress ink onto it to create the “glow” coming from the blue lights.  Used my Crop-a-dile (remember that tool? 😆) to punch blue foil circle “ornaments” from the Memory Box Polished Foil Pad.


Next, on an A2 sized panel, partially applied white embossing paste with a spatula through an English Brick Wall stencil from My Favorite Things.  Stamped the sentiment (discontinued) with Blueptint Sketch distress oxide ink and heat embossed with clear glitter embossing powder.  Assembled the card onto a white top folding card base to finish.


So just a little over a week to enter this challenge ending on September 24 PST.  More inspirations from my team can be seen HERE.  Thank you for stopping by.  Hope to see you in the gallery.


Challenges:

August 14, 2019

Birthday Chaos

Hello there.  I'm back to share a CAS birthday card made for my friend Christine.  Last month she introduced me to gouache paints.  I came home with one successful card (see this post), but the other one was a mess. I was ready to toss it when I figured I had nothing to lose so tried to salvage it.  Well, it worked!  Honestly, I didn’t think it would so it never occurred to me to take a before photo - whoops!


Started by stamping the flower with white pigment ink on black cardstock, then coloured it with gouache paints.  After the colouring was complete, I went to re-stamp it, but the stamp was removed from the MISTI.  Christine attempted to line it up and white heat embossed it.  Well, we all know even with clear stamps, aligning an image perfectly is pretty much impossible.  As you can imagine, there were double outlines and uncoloured areas on the flower. .


What did I do?  I used a black permanent marker to cover up unwanted white lines, filled in the flower with Polychromos pencils and went over the outline with white gouache paints.  Then could you believe it?  I screwed up on the sentiment!  Definitely did not want to toss it after all that effort, so white heat embossed the sentiment onto a black scrap and covered up the other sentiment with it.  Clear shimmer on the flower finished off the card.


I guess in a round about way, Christine had a hand in creating her card. 😂   Well, that does it for today.  Thank you for visiting.


Challenges: