Showing posts with label Honey Bee Stamps. Show all posts

September 14, 2021

Buzzing By

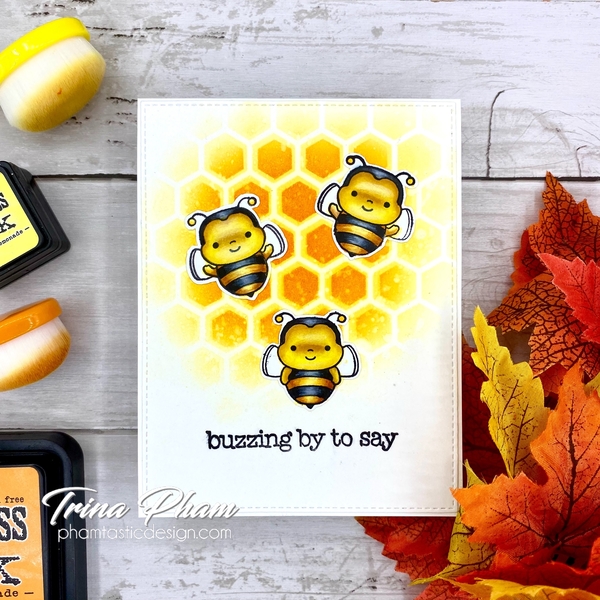
Hello there.  I should be sleeping right now, but at the last possible moment, I finally had an idea for Color Hues (CH) One Year Anniversary challenge #25 - Yellow / Orange.  Happy anniversary to you Nancy and your CH team!


I struggle with the orange colour and it takes time to think of anything! 😂   But here’s my card.


Who knew honeycombs are a mixture of orange and yellow!  I do now. 😂   So the bees from Kraftin Kimmie Sweet as Can Bee were stamped with Memento Tuxedo Black ink on Xpress It cardstock, coloured with Copic markers, then fussy cut out.  Next, on a stitched Bristol panel from my stash, applied Squeezed Lemonade and Spiced Marmalade distress inks with blender brushes through two of the Hexagon Layering Background stencils from Honeybee Stamps (HB).  Splattered with water and blot with a paper towel for some texture, then spritz with a shimmer spray for some sparkle.  Stamped the sentiment from HB Bee-You-Tiful Sentiments with Archival Black ink.  Assembled the card onto a white card base to finish.  


This will be a birthday card for my eldest niece.  She is turning 19 oops, I mean 18 and is currently a freshman in  university on the other side of the country.  I’m still in disbelief how grown up she is.  Anyway, time for bed.  Thank you for dropping by.


September 08, 2021

Guest Designer for Time for Tea Designs September Challenge - Autumn Colours

Hello there!  I am thrilled to be a special guest designer (GD) at Time For Tea Designs (T4TD) this month for their September Autumn Colours challenge.  


It’s no surprise I am drawn to cool colours.  Since these rich, warm colours are outside my wheel house, I decided to take them in a different direction and create a non-traditional colour Christmas/winter card.


Caught me,,, I have never roasted marshmallows outside in the snow, but these critters make me want to. 😂   So Joanna (owner and creative director at T4TD) kindly sent me the digital version (digi) of her Life’s Ups & Downs clear stamp  The campfire scene was set up on the computer and printed out first on plain copy paper then on Xpress It cardstock.  The Xpress It cardstock images were coloured with Copic markers while the plain copy paper images were fussy cut out to be used as masks. 


Added temporary adhesive to the back of the copy paper masks, then masked the images and the snowy ground.  Blended Scattered Straw, Spiced Marmalade, Festive Berries and Aged Mahogany distress inks (DI) with blender brushes to create the background.  Ensured the inks were completely dry before heat embossing the sentiment from Your Next Stamp Cool Tag Banner Sentiments with white embossing powder.  Lightly falling snow was added with a white gel pen to finish.


After some thought, I felt I would be remiss if I didn’t use these autumn colours for an actual fall card.  So I printed out a few other images on Xpress It cardstock, coloured them with Copic markers and fussy cut them out to make this fun mini slimline card.


On Bristol paper cut to 3.25”x6.25” with my paper trimmer, blended Fired Brick, Gathered Twigs and Aged Mahogany DI for the ground.  Used Copic marker E09 to give it some details.  Squeezed Lemonade, Mustard Seed and Spiced Marmalade DI were then applied over a cloud edge stencil from Honey Bee Stamps (HBS) Outdoor Scene Builder for the sky.  Splattered the entire panel with water and blot with a paper towel for a bit of texture.  Splattered with diluted Aged Mahogany DI for more texture.


The leaves (retired) were die cut from watercolor paper smooshed with Fossilized Amber, Carved Pumpkin and Barn Door distress oxide inks.  Added shading and leaf veins to them with Copic markers (forgot which ones I used).  The sentiment from HBS Happy Fall Y’all was stamped with Versafine black pigment ink and heat embossed with clear embossing powder.  Assembled the card onto a white 3.25”x6.25” card base to finish.


Before I go, I want to thank Jo and Jane for having me GD.  I am so humbled by this honour and had so much fun!  Now it’s your turn to show your autumn colour creation!  Don’t have any T4TD products to qualify?  No problem.  Jo has some free digis HERE for you.  Or check out her online store and treat yourself to some crafty goodies.  For full details of the challenge, more inspirations and to link up to the gallery, click HERE.  Thank you for dropping by.


Fall Card Challenges:


August 08, 2021

Guest Designer for AAA Cards Game#196

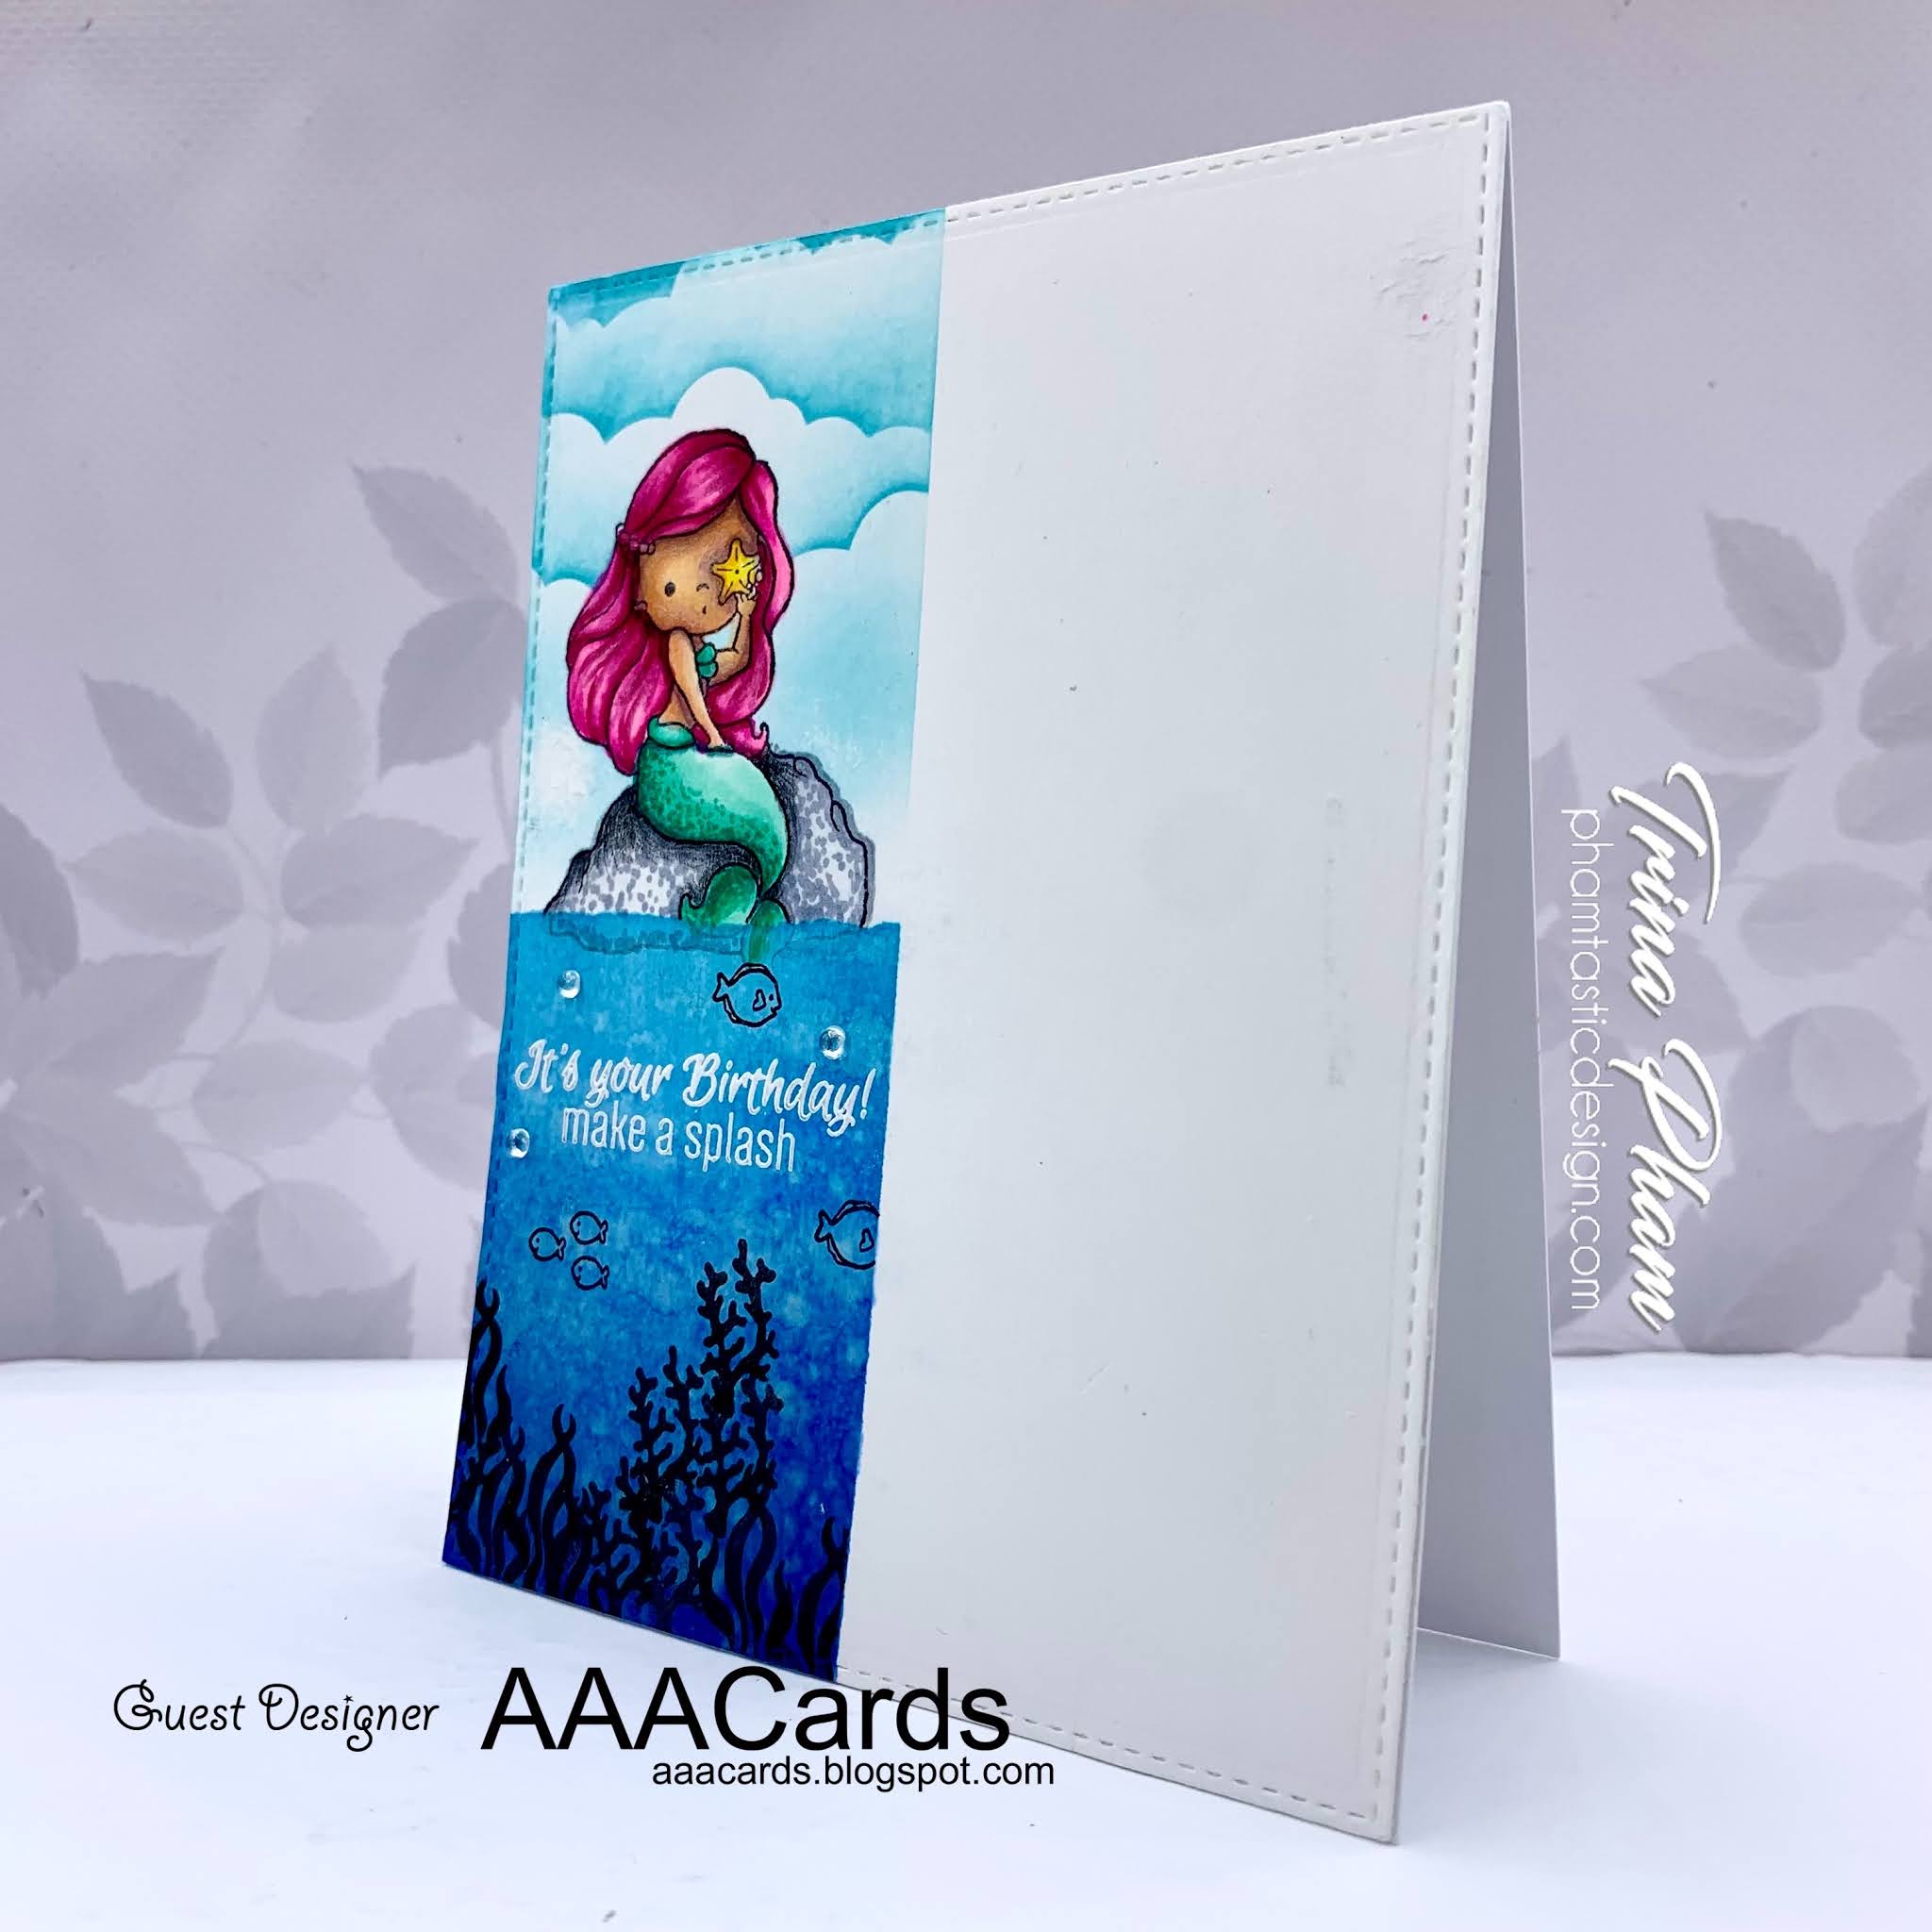
Hello everyone.  I am excited to be guest designing (GD) at AAA Cards this fortnight for their game #196 - Two Quarters + optional twist Favourite Colours.


My favourite colour is blue, so I decided to do a water scene.  I thought about making it monochromatic, but ended up adding pops of colour… I do love a good rainbow after all, and almost turned it into a rainbow colour scheme. 😂  Anyway, I used Mermaid Kisses from SugarPea Designs to create my card. 


On a stitched A2 size (4.25”x5.5”) panel that was die cut from Xpress It cardstock, the right half (2-1/8”) was masked off.  The bottom left quadrant was masked off next, leaving the top left quadrant open to stamp the mermaid with Memento Tuxedo Black ink.  Coloured her in with Copic markers then masked her to blend Tumbled Glass distress ink (DI) over a cloud stencil from Honey Bee Stamps Outdoor Scene Builder to create the sky. 


Masked the top left quadrant next to work on the water scene below.  Ink blended Salty Ocean and Prize Ribbon DI then splattered with water and blot with a paper towel to give it texture and movement.  Stamped the seaweed, coral and fish with Versafine Onyx Black ink.  Dried the panel with my heat tool before heat embossing the sentiment with white embossing powder.  Stamped the bottom of the rock with Memento London Fog ink to unify the scenes.  Embellished with a few clear Fairy Drops from Memory Box to serve as bubbles to finish.


I want to thank Jane and the AAA Cards team for having me.  For the guidance on what the challenge entails and to see the wonderful inspirations from the design team, click HERE.  Thank you for stopping by.


Challenges:


May 28, 2021

It’s a Slothy Birthday

Hello everyone.  I finally inked up a new stamp set from Time for Tea Designs called Be Slothy to create this colourful birthday card. 


The images were stamped with Memento Tuxedo Black ink on Xpress It cardstock, coloured in with Copic markers then die cut out with the coordinating dies.  The sentiment from My Favorite Things (MFT) Bitty Birthday Wishes was then heat embossed on black cardstock with white embossing powder.


Next, ink blended Squeezed Lemonade, Picked Raspberry, Salty Ocean and Twisted Citron distress inks (DI) at a diagonal on a scrap of white cardstock for a rainbow.  Covered it with VersaMark ink and heat embossed with clear embossing powder before die cutting it with the Skinny Upper Alphabet letters from The Stamp Market.  Die cut the letters again from black cardstock to stack and offset for a drop shadow.  


Lastly, stencilled a cloud background along the right edge of a Bristol stitched panel from my stash using Salty Ocean DI and a cloud edge stencil from Honey Bee Stamps Outdoor Scene Builder.  Assembled the card to finish.  

Thank you for visiting.  Have a wonderful weekend.


Challenges:

May 25, 2021

Bouquet of Daisies

Hello there.  Popping in quickly to share a birthday card of fresh daisies made entirely of die cuts.  I used never before used (NBUS) Spring Bouquets from Honey Bee Stamps (HBS) and NBUS Daisy Stems from Memory Box (MB). 


All pieces were die cut from scraps of Xpress It cardstock, except for the daisy centres which were from a scrap of yellow cardstock.  Coloured and/or shaded them in with Copic markers (G46, YG07, BG05, YG06, YG03, YG01, YR16, Y17, Y02, Y000, C3, C1, C00).  


The daisies were doubled up to make them fuller.  Stretched the watering can and turned it into a vase.  White heat embossed the sentiment from Poppy Stamps Birthday Blowout on black cardstock then trimmed it to a strip.  Luckily the stitched Kraft panel attached to a white card base was already in my stash.  Added shading to it to ground the vase.  Popped the bouquet and vase up with foam tape for some dimension.  Added clear shimmer to the daisy centres for a bit of sparkle to finish.


Thank you for dropping by.  Have a wonderful day.


Challenges:

April 05, 2021

Guest Designer for AAA Birthday Game#24 - Shaped Card


Hello again!  I am thrilled to be posting today as a guest designer (GD) at AAA Birthday for their Game #24 - A Shaped Card.


I bought the Big Pickup Tailgate stamp, coordinating dies and alphabet dies from Honey Bee Stamps (HBS), but never got around to using them yet.  So with this fun theme, I took the opportunity to do just that and created a birthday card for my nephew’s birthday last month.


All images were stamped with Memento Tuxedo Black ink on X-Press It cardstock, coloured in with Copic markers and Polychromos pencils, then die cut out with their matching dies.  The puppy is from Hello Bluebird (HB) Snowball Fight winter set.  The hat/balloons are from a retired set.


A white landscape top folding card base was partial die cut with the Big Pickup Tailgate die, ensuring the cutting edge extended past the fold.  The letters were die cut twice from black cardstock and once from silver foil paper then stacked for dimension.  The HB2U license plate was black heat embossed on a white scrap, then die cut out.  Assembled the card, then added Crystal Glaze on the balloons and rear tail lights for some shine and dimension to finish.  


Initially, I was planning to pack the truck with partying critters and accessories, but with two nieces also having birthdays in March, I spread them out to create two more custom cards for them. 


Before I go, I would like to thank Jane and the AAA Birthday team for having me guest for this challenge.  Are you ready to join in the fun?  To see more inspirations from the designers, check out the challenge post HERE.  Thank you for dropping by.  


Challenges:


December 25, 2019

Merry Christmas

Merry Christmas everyone.  Just popping in quickly before heading out for the rest of the day to share  the Christmas cards I made yesterday for my in-laws.  Yup, just in the nick of time. 😂


Pretty straight forward.  The backgrounds were in my stash and I thought there was no better time to use them.  They are Washi tape (Rainbow with Splatters and Nebula) adhered to thick white cardstock and covered with clear gesso.  White splatters were added to them.  The snowmen images (Snow Fun and Snowman Friends) were stamped with black alcohol friendly ink on scraps of alcohol friendly cardstock, coloured with Copics then die cut out with the matching dies.  The sentiments (Fa La La and Magical) are die cut from scraps of white and black cardstock.  Well, except for the magical black shadow which was fussy cut.  Anyway, here they are individually.


Thank you for stopping by.  Enjoy your Christmas,  


Challenges:
Uniko - #56 Christmas optional twist Tree
Cupcake Inspirations - 485 Holidays
Send a Smile 4 Kids - Winter Cards or Anything Goes 4 Kids
Merry Little Christmas - December Anything Christmas Goes
ABC Christmas - Y Yuletide Z Zig Zags  (Yuletide)
Watercooler Wednesday - #252 Marsha’s Special 3-Week Anything Goes