Showing posts with label Kraftin Kimmie. Show all posts

September 14, 2021

Buzzing By

Hello there.  I should be sleeping right now, but at the last possible moment, I finally had an idea for Color Hues (CH) One Year Anniversary challenge #25 - Yellow / Orange.  Happy anniversary to you Nancy and your CH team!


I struggle with the orange colour and it takes time to think of anything! 😂   But here’s my card.


Who knew honeycombs are a mixture of orange and yellow!  I do now. 😂   So the bees from Kraftin Kimmie Sweet as Can Bee were stamped with Memento Tuxedo Black ink on Xpress It cardstock, coloured with Copic markers, then fussy cut out.  Next, on a stitched Bristol panel from my stash, applied Squeezed Lemonade and Spiced Marmalade distress inks with blender brushes through two of the Hexagon Layering Background stencils from Honeybee Stamps (HB).  Splattered with water and blot with a paper towel for some texture, then spritz with a shimmer spray for some sparkle.  Stamped the sentiment from HB Bee-You-Tiful Sentiments with Archival Black ink.  Assembled the card onto a white card base to finish.  


This will be a birthday card for my eldest niece.  She is turning 19 oops, I mean 18 and is currently a freshman in  university on the other side of the country.  I’m still in disbelief how grown up she is.  Anyway, time for bed.  Thank you for dropping by.


July 21, 2021

Happy Swinging Christmas Elf

Hello there.  I have a fun interactive mini slimline Christmas card to share today.  When I saw the Treat Yours-Elf stamp set from Kraftin’ Kimmie, I immediately pictured a pendulum swing card using the smiling male elf image.  And after many months 🙈, I finally made it!  I created the card from memory, but originally I watched this video tutorial HERE.  I’m sure if you do a google search, there are many other options.


The image was stamped with Memento Tuxedo Black ink onto Xpress It cardstock and coloured in with Copic markers.  Used a black marker to extend the string.  To give support, glued it to thick white cardstock, then fussy cut it out.  To strengthen the string portion, it was glued to medium weight acetate. The dry embossed wood panel from my stash was trimmed to 3x6 inches and this panel is where the swing mechanism was created from.  


The pinecones and pine branches are from Memory Box Pinecone Stackers and Forest Pine Branch, respectively.  The pinecone layers were die cut from brown cardstock and a sponge dauber was used to apply white gouache paint to the edges.  To colour the pine branches, Rustic Wilderness distress ink was applied directly to them.  Lightly spritz with water and pat with a paper towel. 


The sentiment from My Favorite Things Bitty Holiday Wishes was heat embossed with Liquid Platinum embossing powder.  Assembled the card onto a white 3x6 inch card base using foam tape and making sure not to impede the swing mechanism.  Nuvo Crystal Glaze on the bauble for some shine finished off the card.  And here’s a video showing it in action.


Thank you for stopping by.


Challenges:


June 15, 2021

CAS Christmas June Reminder - Snowman

Hello there!  This is the reminder post for this month’s Snowman challenge at CAS Christmas.


Due to the lack of space and my preference for clear stamps, I stopped buying red rubber stamps.  I do make exceptions for background stamps... and apparently for adorable stamps from The Sweetest Little Town collection by Stacey Yacula at Purple Onion Designs (POD), too. 😂*lol*   I think it helps that POD offers their stamps unmounted, which make them the same thickness as clear stamps… but I still prefer clear stamps. 😂   My favourite from the collection is Sweet Snow Friends (snowman, penguin & bunny), which I used for my card. 


To temporarily adhere the unmounted rubber stamp to the MISTI stamping tool door, Elmer’s rubber cement glue was applied to the back then let dry for a bit before attaching it.  Stamped the image with Memento Tuxedo Black ink on an Xpress It cardstock panel die cut with the Memory Box Wrapped Stitch Rectangle die.  Coloured it with Copic markers.


Stamped the image again onto masking paper and fussy cut it to create the mask.  Masked the image then blended Salvaged Patina distress ink with a blender brush for the background.  Lightly spritz with water and blot with a paper towel ti give a bit of texture.  Dried the panel with the heat tool before black heat embossing the sentiment from the Jolly Happy Snowmen stamp set by Kraftin Kimmie.  I was going to splatter with some white gouache paint to get a snowy look, but wasn’t confident enough and knew I would ruin it. 😂   Adhered the panel to a white card base to finish.


Have you played along yet?  The challenge ends on June 24 PST, so there is still time.  For more wonderful inspirations from the rest of the design team, head on over to the challenge blog post HERE.  Thank you for stopping by.  


Challenges:

June 03, 2021

CAS Christmas June Challenge - Snowman

Hello there.  The June challenge at CAS Christmas starts now and this month’s theme is Snowman.


I’ve only stretched the Nested Globes dies from Memory Box (mailboxes, rainbowsjukebox), so I thought it was about time I use it as it was intended and made a snowglobe card with it! 😉


Started by stamping the snowman from never before used (NBUS) Jolly Happy Snowmen by Kraftin Kimmie with Memento Tuxedo Black ink on Xpress It cardstock.  Coloured it with Copic markers (B000, B12, B14, B18, E08, E11, E00, C00, C1, C3, C5, C7, C9, 100), then fussy cut out.  

The Snowglobe Base also from Memory Box was die cut from Xpress It cardstock and coloured in with Copic markers as well (E49, E37, E35).  To get the desired width size, partial die cutting was used to cut off from each end.  Lastly, heat embossed the sentiment (retired) with white embossing powder. 


Next, a stitched panel was die cut from Bristol paper using My Favorite Things (MFT) A2 Stitched Rectangle Set 1.  The globe opening was then die cut from it so acetate can be adhered behind to mimic glass.  The bokeh background is pattern paper from Whimsy Stamps Blurry Flurries.  This paper pack is gorgeous and I didn’t want to compete with it by turning this into a shaker.  A snowy slope was hand cut from a scrap of Xpress It cardstock, then assembled the card to finish.  For a bit of dimension, the panel was mounted onto a couple layers of thick white cardstock.      


We have Steph (My Paper Corner) as our guest designer this month.  To check out the inspirations she and the rest of the design team have created, head on over to the challenge post HERE.  The challenge ends on June 24 PST, so there is plenty of time play along.  Thank you for stopping by.


November 03, 2020

CAS Christmas November Challenge - Non-traditional Colours

Hello there.  We’ve reached the final challenge of 2020 at CAS Christmas!  We are taking a break in December to give us more time with our family... hopefully that is, unless Covid has something else in store for us.  This month’s theme is Non-traditional Colours... aka no red and green cards.


Here’s my clean and simple (CAS) card. 😉

Initially I was planning to watercolour the background, so “Rudolph” from never before used (NBUS) Kraftin’ Kimmie Reindeer Games was stamped with Gina K Designs Amalgam Obsidian ink on hot press watercolor paper.  This ink is waterproof as well as alcohol marker friendly.  Coloured Rudolph in with Copic markers, then masked him using contact paper.  The watercolor wash background didn’t turn out, so instead of starting over, I fussy cut out him out. 


Next, I took a stitched Bristol panel from my stash and ink blended Tumbled Glass and Blueprint Sketch distress inks at the top.  Flicked on some water and blot off with a paper towel to give it texture.  Allowed it to air dry before black heat embossing the sentiment (retired) with clear glitter embossing powder.  Adhered the panel to a white card base, then added highlights with a white gel pen and a red glitter enamel dot for his nose to finish.  


Vicky Hayes (Crafting Clare’s Paper Moments) joins us this month as our guest.  To see what she and the designers have created to inspire you, head on over to the challenge post HERE.  A quick reminder that this is a CAS card challenge, so make sure your card has plenty of open untouched space and is not red and green.  The challenge ends on November 24 PST.  Have fun and hope to see you in the gallery.  


Challenges:
NBUS #20 - new stamp

October 31, 2020

Best Card Reaction and Quickest and Most CAS Card Ever

Hello everyone... and happy Halloween to those who celebrate.  Before I get to the quickest and most clean and simple (CAS) card I ever made, I wanted to share a video of the BEST reaction I ever received to one of my cards.  Halloween is not that big of a deal here, but I made this box card for my five-year old nephew, Liam.  I never imagined getting this type of response, especially from him on video because he usually shies away when he knows the camera is recording!  Besides the reminder to call me auntie, his mom said it was all him! He’s growing up fast!  And having had to deal with back/hip issues as of late, he brightened my day and made me the happiest auntie — EVER!  Hope you enjoy the video!


So now onto the quickest and most CAS card I ever made.  As I mentioned above, I haven’t been able to do much lately due to back/hip issues, but the current AAA Cards game #177 Maxi White Space + optional twist Stars spoke to me...


and this is my card.


The shooting star from Kraftin’ Kimmie Christmas Blessings and the sentiment from never before used (NBUS) Altenew Halftone Stars were stamped with white pigment ink onto a navy blue stitched panel from my stash and heat embossed with white embossing powder.  Mounted the panel onto a white card base and filled in the star with a white gel pen to finish!  Done!  Did I mention this is my quickest and most CAS card ever? 😂

Since I used the Altenew star set for the first time, I’m linking to Darnell’s NBUS challenge #19 as well.  Thank you for visiting.  Have a great weekend!


September 23, 2020

Christmas Craft Creations September Reminder - Shaped Card

Hello there.  This is the reminder post as guest designer at Christmas Craft Creations (CCC) for their September Shaped Card challenge.

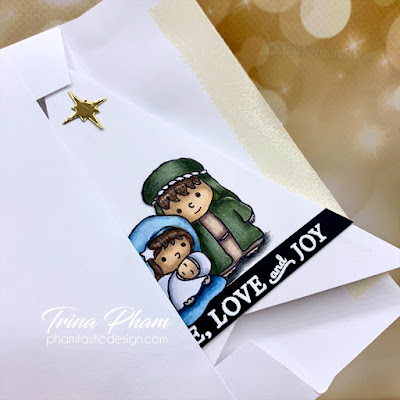
I used a new NBUS stamp set from Kraftin Kimmie called Christmas Blessings and went old school creating a pyramid card... at least that was what it was called when I first made it way back when. 😂  These days they are referred to as a teepee card.  Here’s my card.


I made this from memory, but if you googled teepee card, I’m sure you can find tutorials for it.  The three 4” squares that form the base were cut from Bristol paper.  Scored each square once diagonally corner to corner, fold along the scored lines then assembled to the pyramid shape.  I tried using pattern paper and even ink blending to decorate the background like you see on these types of cards, but the image got lost in it, so I just kept it really clean and simple (CAS).


The image was stamped with Memento Tuxedo Black ink on X-Press It cardstock, coloured with Copic Sketch markers and Polychromos pencils, then fussy cut out.  The sentiment from the same set was white heat embossed on black cardstock then trimmed down to a strip.  I wanted the front to be seamless so I traced the folded down base onto Bristol paper and hand cut it out.  The star (unknown) was die cut from gold foil paper.  Assembled the card and added shading below Joseph with a gray color pencil to finish.  I couldn’t find my velcro, so held it together with temporary tape to take the picture,  but when I send it, the velcro will be added.  Here it is folded down to fit into an envelope.


I want to say a big thank you to Charlotte and the CCC team for having me guest design this month.  Shaped cards are so fun. The challenge ends on Tuesday October 13th at 6pm GMT.  For more inspirations, head on over to the challenge reminder post HERE.  Hope to see you in the gallery.  Thank you for visiting.  


Challenges:
Merry Little Christmas - #26 September Anything Christmas Goes
Jenn Shurkus Get Cracking on Christmas - Anything Christmas Goes
NBUS #18 - new stamp set
Love to Craft - #50 September Anything Goes