Showing posts with label interactive. Show all posts

July 21, 2021

Happy Swinging Christmas Elf

Hello there.  I have a fun interactive mini slimline Christmas card to share today.  When I saw the Treat Yours-Elf stamp set from Kraftin’ Kimmie, I immediately pictured a pendulum swing card using the smiling male elf image.  And after many months 🙈, I finally made it!  I created the card from memory, but originally I watched this video tutorial HERE.  I’m sure if you do a google search, there are many other options.


The image was stamped with Memento Tuxedo Black ink onto Xpress It cardstock and coloured in with Copic markers.  Used a black marker to extend the string.  To give support, glued it to thick white cardstock, then fussy cut it out.  To strengthen the string portion, it was glued to medium weight acetate. The dry embossed wood panel from my stash was trimmed to 3x6 inches and this panel is where the swing mechanism was created from.  


The pinecones and pine branches are from Memory Box Pinecone Stackers and Forest Pine Branch, respectively.  The pinecone layers were die cut from brown cardstock and a sponge dauber was used to apply white gouache paint to the edges.  To colour the pine branches, Rustic Wilderness distress ink was applied directly to them.  Lightly spritz with water and pat with a paper towel. 


The sentiment from My Favorite Things Bitty Holiday Wishes was heat embossed with Liquid Platinum embossing powder.  Assembled the card onto a white 3x6 inch card base using foam tape and making sure not to impede the swing mechanism.  Nuvo Crystal Glaze on the bauble for some shine finished off the card.  And here’s a video showing it in action.


Thank you for stopping by.


Challenges:


August 27, 2020

Pop-Up Birthday Card Requested

Hello there.  I can’t believe my nephew turned 5 today! 😱  A few weeks ago, he asked for a pop-up card.  I went old school and made him a free standing pop-up card following the tutorial HERE.  This is what it looks like collapsed to fit into an envelope.


Here it is “popped up”.

SugarPea Designs Chunky Monkey stamp set was used.  Stamping was done with Memento Tuxedo Black ink on X-Press It cardstock and colouring was done with Copic markers.  The sentiment from the same set was heat embossed with white embossing powder.


The images in the forefront were die cut out with the matching dies.  Masking was used for the images on the pull-up panel.  The background was created by blending turquoise dye ink with a blender brush over a cloud edge stencil.  Personalized his card by adding his name on the back using Vintage Varsity Alphabet dies from Memory Box.  

Even though he was expecting a pop up card, I think he was still pleasantly surprised and kept asking how it was made.  Told him it’s a trade secret. *lol*😂   Thank you for joining me today.  Have a wonderful weekend.


Challenges:
The Male Room - #141 7th Birthday
Papercraft - #61 Animals
Cupcake Inspirations - #500 Birthday Celebration
Stamping Sensations - August challenge Make It Masculine
Watercooler Wednesday - #286 Marsha’s challenge All About Occasions

June 14, 2019

A Hinge / Swing Card

Happy Friday everyone.  I'm sharing a fun interactive birthday card today.  Some call it a hinge card; others call it a swing card.  I've done this card many years ago and Ilda reminded me of it when I saw her card on her IG account.  She has a video tutorial HERE if you are interested in trying one yourself.


A stitched rectangle panel was die cut from Bristol paper.  Wilted Violet, Blueprint Sketch and Salty Ocean distress inks were then blended on with blending brushes to create the sky. Spritz with water and dried with a paper towel for some texture.  Added a few diecut clouds to complete.  


The elephant was stamped with Copic friendly black ink on X-press It cardstock, coloured in with Copics then die cut out with the matching die.  Added a penny behind the elephant to give it some weight when it swings.  Used a couple of circle dies and a slider disc to create the hinge swinging portion (Ilda's video shows how).  


Black heat embossed the sentiment, then assembled onto a white card base.  Added Crystal Glaze to the balloon to finish.  Here's my first still photo video to show it in action.


So fun and super easy.  Thank you for stopping by.  Have a wonderful weekend.


Challenges:
Seize the Birthday - #167 Anything Goes
Love to Craft - #35 June Anything Goes
Watercooler Wednesday - #225 Donna's All About Occasions
Sweet Stampers - Anything Goes 
Send a Smile 4 Kids - Cards for Teens or Anything Goes 4 Kids


November 17, 2018

CAS Christmas November Reminder - Santa


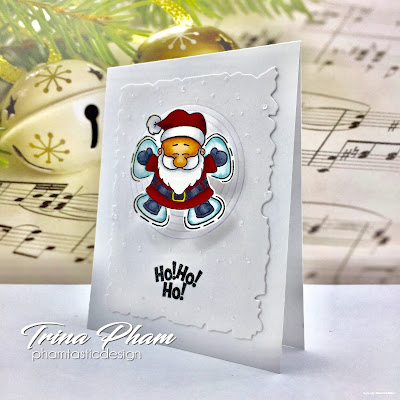
Hello there!  I'm here with the reminder post for this month's Santa challenge at CAS Christmas.  It's hard to believe, but Christmas is just a little over a month away!  I must say this is the first year I am not rushing to complete my Christmas cards!  YAY!  And here's my card.


Remember how fun it was to  play in the snow and make snow angels?  Well, Santa thinks so too! 😉  This snow angel-making Santa was waiting to be put on an action wobble.  Action wobble cards are the easiest interactive cards to make.  Here's a short video of it in action.


Using Copic friendly black ink and stamping on X-press It cardstock, stamped the hat from the same set first, masked it then stamped Santa.  Removed the mask and coloured in with Copics.  Had to fussy cut the image out because there is no coordinating die with Santa wearing the hat.


Next an Antique Frame panel was die cut from mixed media paper.  "Snow angel" marks were created by dry embossing with Infinity Circle nesting dies.  The sentiment was black heat embossed using Versafine black ink and clear glitter embossing powder.  Mounted Santa with a mini action wobble then added some white glitter Nuvo drops for snow to finish. 


The challenge ends in a week on November 24, so there is still time to get your entries in.  Our wonderful guest, Pam of Expressions with Heart, and my team have created more fabulous reminder cards and you can see them on the CAS Christmas blog HERE.  Hope to see you in the gallery.  Thank you for visiting. 


Challenges:
Sweet Stampers - #26 Christmas
Merry Little Christmas - #4 November Anything Christmas Goes
Send a Smile 4 Kids - Anything Goes 4 Kids
Addicted to Stamps and More - #318 Holidays
Sparkles Christmas - #95 Embossing Heat or Dry
AAA Cards - #128 On the Move (making snow angel action wobble)
Watercooler Wednesday - #196 Heidi's All About Occasions
Stamping Sensations - November Get Ready for Christmas


October 27, 2018

Leading Lady for Winnie and Walter Take Four


Happy Saturday everyone!  Time sure does fly when you're having fun, doesn't it?  Today is my final post as the October Leading Lady for Winnie & Walter (W&W)!  I want to thank Shay again for entrusting me to take over their blog every Saturday this month.   It has been an honour and I've enjoyed every minute of it!

So last week I ended with an interactive spinner card.  Interactive cards are very popular right now, even though they've been around for a very long time.  Die versions may be available and make it easier, but essentially all of them can be created without one.  I have two samples to share.


BIRTHDAY SURPRISE

You knew one of my cards had to be a birthday.  A scallop rectangle panel was die cut from Whisper White cardstock with Essentials: Audrey Cutaways.  Happy from In a Word: Happy stamp set was stamped in black.  In a Word: Birthday cutaway was die cut from X-press It cardstock and ombre coloured with a mini blending tool and Black Soot distress ink.  A couple of streamers from The Party Confetti cutaways were die cut form silver foil paper and added as embellishment.


I wanted to keep the front super CAS and monochromatic because the par-tay starts on the inside!

Yup, my first card is an inside pop up box card.  After watching the videos, I figured out the scoring and cutting.  For this particular box, I wanted a 1-1/4" box that is 3/4" high.  So I multiplied 1-1/4" by 4 because a box has 4 sides.  Then I added a 1/4" for the tab to attach the box ends together.  Added 3/4" to 1-1/4" for the height and my starting cardstock piece is 5-1//4" x 2".  Scored the short side at 3/4" and every 1-1/4" on the long side.  Used scissors to cut out some sections to get this.


Fold along the scored lines and assemble the box.  Add strong adhesive to the triangles and adhere the box on a diagonal with the crease of the card base.


A couple of 1/2" x 1-3/4" strips scored at 1/4" on both ends were added inside the box.  These were where acetate strips adhered to, which in turn how the balloons and hats were added to pop out of the box.  The balloons from Big Round Balloons cutaways were die cut from white cardstock and coloured with distress inks and a mini blending tool.  The hats from Happy Dance with Evelin T Designs were stamped with black Copic friendly ink on scrap of X-press It cardstock, coloured with Copics then die cut out with the coordinating dies.  Silver foil streamers and confetti was added to finish.


CHRISTMAS WHEEL

I may be dating myself, but the popular reveal wheel is what I knew as a viewfinder card.


Started by stamping the images from Season's Tweetings by Evelin T Designs with black Copic friendly ink, coloured with Copics and die cut out with the matching dies.  From a stitched white panel, partial die cut a circle opening.  Instead of trimming a straight edge across, I used my scissors and cut a slope.  Adhered the images around the window to create the scene.


For the wheel, I wanted a white border so a reverse circle mask was die cut from masking paper and adhered onto Bristol paper.   Added various distress inks with a mini blending tool then die cut out with a scallop circle die.  Die cut another scallop circle but this time from copy paper.  Fold the copy paper in half then into quarters to find the centre.  Align both scallop circles and pierce the centre with a piercing tool.


On the back of the scene panel, position the scallop circle then pierce through the scallop circle and the panel.  Use the hole as a guide to cut a semi circle on the side edge.  Secure the wheel to the panel with a brad.  Pop the panel onto a white cards base by adding mounting tape around the edge of the wheel.  White heat embossed the sentiment from Sweet Holiday with Evelin T Designs on black cardstock and popped it up with mounting tape over the brad to hide it.  Added snow over all images with a white gel pen to finish.   Here are more views of the different sky colours with turns of the wheel.


*** Updated: Here's a video ***


GIVEAWAY

Thanks to Shay's generosity, I have a $30 W&W gift card to give away to one lucky commenter here on my blog.  For your chance to win, leave a comment on any of my Leading Lady posts by October 31 and I will randomly pick a winner from all comments left across my posts.


That concludes my time here at W&W.  I want to thank all of you who stuck with me and left such kind comments.  I was not feeling very well this week, and reading your comments brightened my day!  Have a wonderful weekend!


Challenges:

Birthday card
Always Happy Birthday - October Anything Birthday Goes
Mix It Up - #18 October Anything Goes optional twist Monochrome
Love to Craft - October Anything Goes

Christmas card
Jingle Belles - While Shepherds Watched Their Flocks
Watercooler Wednesday - #193 Tristan's All About Holidays