Showing posts with label Hero Arts. Show all posts

April 17, 2026

Spellbinders - Lemonade Stand Birthday

Hello there.  I am sharia a refreshing ๐Ÿ˜‰ birthday card today featuring the Pink Lemonade Stand and Pink Lemonade Stand Tags die sets from the Pink Lemonade collection released last month in March by Spellbinders (SB) with Simple Stories.  I thought the colours for The Paper Players challenge #781 were perfect for a lemonade themed birthday card.  Here’s my card. 


This is an A6 (4.5x6.25-inches) size card as not to crowd the large lemonade stand sign.  All pieces were die cut from white, black, Smoky Slate or Daffodil Delight cardstock and shaded with Basic Gray dye ink.  Extra strips of Smoky Slate wood were die cut to “build” the crate for the lemons.  Black Copic Sketch marker 100 was used to “nail”it together.  The awning from The Flower Cart (currently on sale in the 2026 Spring Warehouse Sale) was trimmed off the top and popped up with foam tape. 


Shading on the pinwheel and flower centres was done with Copic Sketch markers YR23/24/27.   The sentiment from Hero Arts Let’s Celebrate stamp set was white heat embossed .  Assembled the card onto an A6 size Bristol panel then mounted it onto a side folding A6 card base.  Added light shading beneath the objects to ground them to finish. 


Products used for my card are linked below.  Please note compensated affiliate links are used in this post at no extra cost to you.  I appreciate your support.  Thank you for visiting 


* sale ends at 11:59 pm PDT on April 27, 2026 *
* some products may also be available at Simon Sats Stamp or Scrapbook.com *
Challenges:


October 19, 2025

CASE Me A Christmas Card 2025

Hello there.  I’m excited to be back as a guest for Michelle Lupton’s CASE Me A Christmas Card 2025 series.  A big change this year.  There are 10 hops in October - two on YouTube (YT) and eight on Instagram (IG) - where hop participants will CASE (Copy And Selectively Edit) cards from fellow crafters. 


Today I’m in IG Hop 7 with this card. To see the card I CASEd and hop along, head on over to my IG post HERE.


This year, anyone can join in the fun with your own CASEd card and be eligible for a prize from one of the many generous sponsor!  Don’t miss out and be sure to check it out.  Thank you for stopping by. 


Challenges:

November 07, 2024

Warm Cozy Wishes

Hello there.  I’m quickly popping in to share a fun and easy cocoa themed Christmas/Winter card created with Hug in a Mug stamp and cut and Nesting Oval Infinity dies from Hero Arts.


The Santa/elves cups were die cut from red/green cardstock while the cocoa was die cut from Kraft cardstock.  They were then ink blended with distress inks (DI).  The sweet toppings were die cut from X-Press It paper and coloured/shaded with Copic Sketch markers.  

DI used:
greens - Mowed Lawn/Lucky Clover, Black Soot 
red - Lumberjack Plaid, Black Soot
brown - Gathered Twigs
Copic markers used:
reds - R05/27/46
whites - C00/1, 0


Used an oval infinity die to die cut the belts from black glossy paper.  The curve of the oval matched the curve of the cup bottoms nicely.  Next, trimmed squares of black glossy and gold foil papers to create the buckles.  Adhered all the cup/topping layers onto an A2 sized Bristol panel then black heat embossed the sentiment.  Mounted the panel to a white card base to finish.  

Please note that affiliate links were used in this post when possible at no extra cost to you.  I appreciate your support.  And that’s it for my card.  Thank you for stopping by. 

September 30, 2024

Guest Designer for Colorful Options October 2024 Challenge - Orange

Hello there.  I’m delighted to be guest designing (GD) this month at Colorful Options (CO) for their October 2024 challenge where the colour is ORANGE.  If this colour does not appeal to you, there is always the rainbow option.

*affiliate links used when possible in this post at no extra cost to you… thank you*

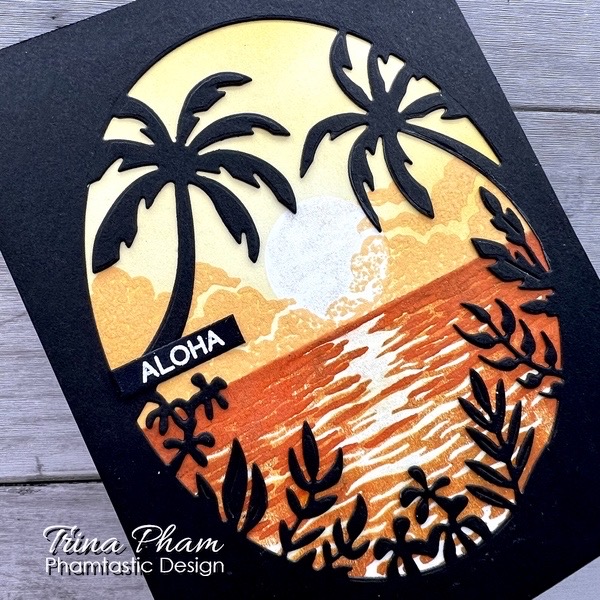
Ironically, I struggle with the orange colour and almost made a rainbow card. ๐Ÿ˜‚  My first thought was to go the obvious autumn theme route, but then decided to put a couple of never-before-used (NBUS) Hero Arts (HA) products to work and stretch out summer.


Warm & Cosy crisp dye inks from Altenew were used to stamp the scene with the HA Color Layering Sunset Over Waves stamp set on Bristol paper.  A sun mask was die cut from masking paper next using a HA Circle Infinity die.  Stamped the water layers first, adhered the sun mask and ink blended leftover orange ink from a blender brush for the sky.  Removed the mask and stamped the clouds.  For a bit of sparkle, applied clear shimmer to the sun and the sunlight reflection trail in the water.


The Tropical Foliage Window was die cut from black cardstock.  The sentiment from Everyday Sentiment Strips was in my stash.  It had been heat embossed on black cardstovk with white embossing powder, then die cut out with the Sentiment Strips fancy die.  Assembled the card onto a white card base to finish. 


I want to thank Makira and the CO team for this GD opportunity.  For inspirations from the team and/or to link up your entry, please click HERE.  Hope to see you in the gallery.  Thank you for stopping by.


Challenges:
NBUS #67 - new stamp & die 


December 13, 2023

Guest Designer for Christmas Craft Creations December 2023 Challenge - Christmas Decorations


Hello there.  I’m excited to be guest designing (GD) this month at Christmas Craft Creations (CCC) for their DECORATIONS challenge. 


There are so many options, but I had to CASE the cute Santa belly Festive Ornaments die from Spellbinders using products I already have.  Here’s my fun card.


The Hero Arts (HA) Infinity Circle die was used to die cut the ornaments from red glitter paper.  The attachment loop was die cut from gold foil paper using HA Infinity Nesting Ornaments.  The string and belt were created with my paper trimmer and gold foil paper and/or black cardstock.  The belt is 1/4” wide black strip; the buckle is 1/4” black square mounted on top of a 1/2” gold foil square.  If you have square dies, it would make it even simpler.


The letters “H” were die cut from gold glitter paper and black cardstock using the Bold ABC dies from Whimsy Stamps.  The HA Winter Foliage was used to die cut the pine branches from Bristol paper. Assembled the die cut pieces onto a white woodgrain panel, then black heat embossed the sentiment (from the same set) with clear glitter embossing powder directly onto the panel to finish.


I would like to thank Charlotte and the CCC team for having me GD this month.  For inspirations from them and/or to link up your entry for the challenge, click HERE.  Thank you for stopping by.


Challenges:
Tic Tac Toe - #238 Featured Designer Felicita (diagonal: December Holiday, Ornament, Die Cut) 

October 03, 2023

Peeking Snowman and Friends

Hello there.  I’m back today with another non-traditional colour Christmas card featuring another new product from a recent Hero Arts order.  I used the Peeking Snowman die for my card.  This snowman couldn’t be any cuter, right?.… wellll, how about with two of his friends joining him! ๐Ÿ˜‰


Except for the main part of the top hat which was die cut from dark gray, all pieces were die cut from white cardstock.  The carrot noses and the toque hat brim were coloured/shaded with Copic Sketch markers, while ink blending with distress inks (DI) using blender brushes was done on the rest.

Copic markers used:
toque brim - C1/2/3 
carrot - Y38, YR04/07/27 
shading - C00/1/2
DI used:
purples - Shaded Lilac, Wilted Violet, Villainous Potion 
top hat - Black Soot


Used the Crop-a-dile (remember that tool? ๐Ÿ˜‚) to punch out the eyes from black cardstock.  The birch tree (retired My Favorite Things die) was die cut from Bristol paper and inked with Pumice Stone DI.  The sentiment from Winter Foliage was heat embossed on black cardstock with white embossing powder.  It was a bit crowded on a standard A2 size card, so the card was assembled onto an A6 size (4.5x6-inch) Bristol panel that was lightly ink blended with Shaded Lilac DI at the top.  Added falling snow and highlights to their eyes with a white gel pen to finish.  


Almost forgot to mention that partial die cutting of the hat on the front snowman was done using the circle opening part of the peeking snowman die.  Hope that makes sense.  Anyway, that does it for my card.  Thank you for stopping by.


* product affiliate links used at no extra cost to you… thank you for shopping with me*

Challenges:
Tic Tac Toe - #228 Featured Designer Felicity   (diagonal - Purple, Orange, Black)
NBUS #55 - new die

October 01, 2023

Guest Designer for Color Hues Challenge #73 - Coral and Blue


Hello everyone.  I’m excited to be guest designing (GD) today at Color Hues (TCH) for their challenge #73 - Coral and Blue


My first idea didn’t pan out, so I put a couple of new products from a recent Hero Arts order to work.  I used the gorgeous Color Layering Poinsettia Window stencils with a sentiment from the Winter Foliage stamp and cut XL set to create a non-traditional colour Christmas card.


To be honest, this well-designed stencil set did most of the work and made the creating process pretty easy.  Distress inks (DI) and blender brushes were used to apply inks through  the stencils onto an A2 size Bristol panel.  A quick side note… the berries were coloured with Abandoned Coral DI then darkened with residual Black Soot DI left on the brush.

DI included:
corals - Saltwater Taffy, Abandoned Coral, Black Soot 
blues - Stormy Sky, Faded Jeans, Chipped Sapphire 
grays - Lost Shadow, Black Soot  


I have the complementary die, but opted to keep it simple by stamping the sentiment with Versafine Onyx Black ink directly on the panel and heat embossing it with clear glitter embossing powder for some sparkle.  Adhered the panel onto a white card base, then added a highlight dot to the berries with a white gel pen and clear jewels by Memory Box to the poinsettia centers to finish.

I want to thank Nancy and TCH team for this GD opportunity.  For more inspirations and/or to link up your card, click HERE.  Products used for my card are linked below.  Thank you for stopping by.


*affiliate links used at no extra cost to you… thank you for shopping with me*

Challenges:
NBUS #55 - new stencils, stamp