Showing posts with label Whimsy Stamps. Show all posts

February 13, 2026

Guest Designer for 52 Christmas Card Throwdown February 2026 Colour Challenge - Gold & Black

Hello everyone.  I’m excited to be guest designing (GD) at 52 Christmas Card Throwdown (52CCT) for their GOLD & BLACK colour challenge. 


One of the designs in the Whimsy Stamps (WS) Champagne slimline paper pack was the starting point for my card.  I used a silhouette stamp set and a holy star die (unfortunately, both are discontinued/unavailable) to create this nativity scene.


The pattern paper was trimmed down to 4.25”.  Stamped the images with Versafine Onyx Black ink then heat embossed with clear glitter embossing powder.  Stamped the sentiment on a A2 size black panel with VersaMark ink next and heat embossed with gold embossing powder.  Die cut the star from gold glitter paper, then assembled the card onto a black card base to finish. 


I want to thank the 52CCT team for having me GD.  Please note affiliate links were used when possible in this post, so if you click on a link or two, I will get a small compensation at no extra cost to you… your support is appreciated.  Thank you for dropping by. 

September 01, 2025

Guest Designer for Colourful Options September 2025 Challenge - Anything Goes

Hello there.  I’m excited to be back as a guest designer (GD) this month at Colorful Options (CO) for their ANYTHING GOES (AG) challenge.

*please note: affiliate links were used in this post, so by clicking on them and making a purchase,I will receive a small compensation at no extra cost to you*

Can’t believe my nephew in this post is now a tween! I used products from Whimsy Stamps (WS) to make this card for him, but then realized it’s too young for him..  oh well. 🤷🏻‍♀️ 

Distress inks (DI) in rainbow colours.were ink blended through a die cut circle stencil in three areas on a Bristol panel.  The pandas from Panda Peekers were stamped with Memento Tuxedo Black ink on X-Press It paper, coloured with cool gray Copic Sketch markers then fussy cut out.  To have them “popping” out from the circles, they were then die cut with the same circle die used to create the stencil.  The paws of the top two pandas had to be fussy cut out and adhered to fit the circle. 


The “bears cool!” Punny part of sentiment was die cut from white and Iombré ink blended with Blueprint Sketch DI.  To define the “cool”  letters, Copic Sketch markers B0000 and FB2 were used.  The other part of the sentiment from Yeti Birthday was stamped with Blueprint Sketch distress oxide ink and heat embossed with clear embossing powder.  Adhered and assembled the card onto a white card base to finish. 


I would like to thank Makira and the CO team for having me join them again.  Play along
 in the fun and link up your project HERE.  Thank you for stopping by. 


Challenges:
Tic Tac Toe - #278 Featured Designer Felicita    (top row - Stencil, Birthday, Die Cut)

February 01, 2025

Guest Designer for Color Hues Challenge #103 - Pink and Red

Hello everyone.  I’m delighted to be guest designing (GD) at Color Hues (TCH) for their PINK AND RED special collaboration challenge with Inkspiratiinal.


With it being February, these colours are geared towards Valentines, but I don’t really celebrate it, so I made a cute circle-shaped shaker card instead (no hearts) using products from Whimsy Stamps (WS). 

*affiliate links were used in this post at no extra cost to you… thank you for your support!*

The bear from Teddy Bear Christmas Eve (love stretching my supplies😉) was stamped with Memento Tuxedo Black ink on X-Press It paper, coloured with Copic Sketch markers then die cut out with its matching die.  A white Posca pen was used to add details/highlights to the gifts. 

Copic markers used:
reds - R27/46 
browns - E50/51/53/55/57 


Used the Pierced and Stitched Circles die set to die cut the circle cutouts, frames and card base (did partial die cutting for this).  Backed the opening of the top frame with acetate, then stacked five frames underneath to form the compartment where the shaker bits are contained.  Treated the area with anti-static powder to help the bits to shake freely.  Stamped the Cosmic Swirl Background with pink dye ink and white heat embossed the sentiment onto red cardstock before assembling the card to finish.


I want to thank Nancy and TCH team for having me GD with them.  Remember this is an 2-for-1 challenge… create one card and link up to two challenges.  WS products used for my card are linked below.  Thank you for stopping by. 


Challenges:

January 06, 2025

Guest Designer for Day of the Month Card Club January 2025 Challenge - #71 Hot Tea

Hello there.  I’m delighted to be guest designing this month at Day of the Month Card Club (DotMCC) for their challenge #71 Hot Tea.

*affiliate links used in this post when possible at no extra cost to you… thank you*

Here’s my card.


I didn’t have anything tea specific, so used Sugar Pea Designs (SPD) Letter Message Board to create a custom punny sentiment.  A Whimsy Stamps (WS) 3-in-1 Mitered Frame (middle frame) was then die cut from Kraft cardstock and trimmed down for a narrower frame.  The cups/saucers (retired from Poppy Stamps) were die cut from white scraps and ink blended with Kraft or gray dye inks.  Thought it would be cute, so stamped the faces (from closed down Your Next Stamp) in black.  You could also just draw in the faces. 😉 


For the background, the bottom half of an A2 size Bristol panel was masked off and the upper half ink blended with Lumberjack Plaid, Aged Mahogany and Black Soot distress inks (DI) over a brick stencil (retired from My Favorite Things).  The glasses (new to me and sadly, already retired from SPD) was die cut from Memory Box Black Glossy paper.  Adhered and assembled the card onto a white card base, then added shading under the objects with gray dye ink using a detailed blender brush to ground them.  Drew in the steam with a white Posca pen to finish! 


I want to thank the DotMCC team and everyone who voted for my November 2024 challenge card to give me this GD opportunity.  Hope you will join in the fun and link up your entry HERE.  Thank you for stopping by. 


Challenges:
My Time To Craft - #550 New (new glasses die)
Die Cut Divas - Something New (new glasses die) 

August 06, 2024

Guest Designer for Try It On Tuesday Challenge - Keep It Simple

Hello everyone.   Still not crafting much due to health issues, but I’m excited to be a guest designer (GD) at Try It On Tuesday (TIOT) this fortnight for their KEEP IT SIMPLE challenge. 


I used Bee Happy stamp and Honeycomb Pattern die from Whimsy Stamps (WS) for a punny CAS (clean and simple) “bee-lated” birthday card.  


The bee was stamped with Memento Tuxedo Black ink on a scrap of X-Press It paper, coloured with Copic Sketch markers then fussy cut out.

Copic markers used:
yellows - Y000/11/15, V01
blacks - C5/6/8


Next, two white panels were trimmed to 5x3.75-inches.  The sentiments were stamped in black on one panel using the MISTI stamping tool.  The other panel was die cut with the honeycomb die, then glued on top of the other panel.  Inlaid the honeycomb, then placed it back into the MISTI to re-stamp the sentiments on top of the honeycomb.  Assembled the card onto a white card base and added clear shimmer to the wings for a bit of sparkle to finish. 


I want to thank Jo and the TIOT team for the GD opportunity.  For more inspirations from the design team and to link up your entry, click HERE.  Key products used/mentioned in making my card are linked below.   Thank you for dropping by.  


*affiliate links used when possible at no extra cost to you… thank you*


Challenges:
Seize the Birthday - #288 Tic Tac Toe (diagonal - stripes (bee), clean & simple, sentiment without the word birthday)

May 01, 2024

Guest Designer for Colorful Optiins May 2024 Challenge - Royal Blue

Hello there.  I’m excited to be back with a second guest designing (GD) post today.  This time it’s at Colorful Options (CO) for their May challenge where ROYAL BLUE is the colour of the month.  If you are not wild about that colour, a rainbow option is always available.  Here’s the challenge inspiration graphic. 


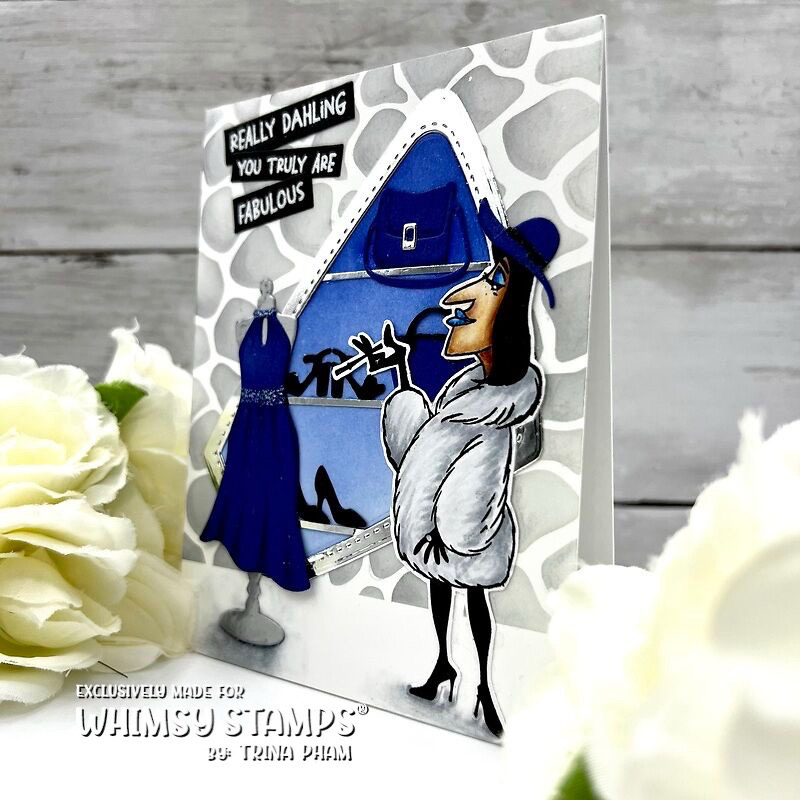
Ironically, GD this month at CO gave me deja vụ… check out my post from last May HERE to see why. 😉  Princess Kate wearing the gorgeous gown in the challenge graphic above was the inspiration this year and I used the new fashion products from Whimsy Stamps (WS) latest release to create this “truly fabulous darling” card. 😂*lol*


The dress from Fashion Dresses and accessories from Fashion Accessories die sets were die cut from blue and/or black cardstock.  Added shading/details to the blue pieces fittingly with Royal Blue Copic Sketch marker B28.  Tried to add some sparkle to the dress with a white gel pen… didn’t work as well as I had imagined. 😂*lol*   Stamped the fashionista from Slay the Day with Memento Tuxedo Black ink on X-Press It paper and coloured with Copic Sketch markers before fussy cutting out.  

Copic markers used:
skin - E00/11/53/04 
lips/eye shadow - B12, FB2, B28 
fur - C00/1/3 
grounding/shadows - C00/0/1/2/3/4/5 


The Fashion Dress Form was die cut from silver shimmer paper.  The marquee was die cut from an A2 size Bristol panel then the cutout ombré ink blended with Blueprint Sketch distress ink.  The marquee frame was die cut from silver foil paper.  Trimmed strips from silver foil paper for the shelves.  Grey dye ink was then ink blended over a Giraffe stencil on the Bristol panel for the cobblestone wall.  White heat embossed the sentiments on black cardstock, then assembled the card onto a white card base to finish. 


I want to thank Makira and the CO team for this GD opportunity.  For more inspirations and/or to link up your entry, click HERE.   To see the April release from WS, click HERE.  WS products used for my card are linked below.  Thank you for stopping by. 


*affiliate links used in this post when possible at no extra cost to you… thank you!