Showing posts with label Sugar Pea Designs. Show all posts

January 06, 2025

Guest Designer for Day of the Month Card Club January 2025 Challenge - #71 Hot Tea

Hello there.  I’m delighted to be guest designing this month at Day of the Month Card Club (DotMCC) for their challenge #71 Hot Tea.

*affiliate links used in this post when possible at no extra cost to you… thank you*

Here’s my card.


I didn’t have anything tea specific, so used Sugar Pea Designs (SPD) Letter Message Board to create a custom punny sentiment.  A Whimsy Stamps (WS) 3-in-1 Mitered Frame (middle frame) was then die cut from Kraft cardstock and trimmed down for a narrower frame.  The cups/saucers (retired from Poppy Stamps) were die cut from white scraps and ink blended with Kraft or gray dye inks.  Thought it would be cute, so stamped the faces (from closed down Your Next Stamp) in black.  You could also just draw in the faces. 😉 


For the background, the bottom half of an A2 size Bristol panel was masked off and the upper half ink blended with Lumberjack Plaid, Aged Mahogany and Black Soot distress inks (DI) over a brick stencil (retired from My Favorite Things).  The glasses (new to me and sadly, already retired from SPD) was die cut from Memory Box Black Glossy paper.  Adhered and assembled the card onto a white card base, then added shading under the objects with gray dye ink using a detailed blender brush to ground them.  Drew in the steam with a white Posca pen to finish! 


I want to thank the DotMCC team and everyone who voted for my November 2024 challenge card to give me this GD opportunity.  Hope you will join in the fun and link up your entry HERE.  Thank you for stopping by. 


Challenges:
My Time To Craft - #550 New (new glasses die)
Die Cut Divas - Something New (new glasses die) 

June 17, 2022

CAS Christmas June Reminder - Wreath

Hello there.  This is the reminder post for this month’s WREATH challenge at CAS Christmas.


Here’s my card.


That cute little puppy in the wreath image is from Yappy Woofmas stamp set by Mama Elephant (ME). Stamped it with Memento Tuxedo Black ink on alcohol marker friendly cardstock that was die cut out with the Blanket Stitched Rectangle die from Pinkfresh Studio.  Coloured it with Copic Sketch markers then added clear shimmer to the berries and bow for a bit of sparkle. 


The letters were die cut next from Bristol paper and black cardstock using Block Alphabet dies from SugarPea Designs.  Offset them for a drop shadow, then adhered them to the panel.  To finish, stamped the sentiment from Waffle Flower Oversized Joy with Versafine Onyx Black ink and heat embossed with clear embossing powder.


Since I’m behind on my Christmas card stash, I made a second card using Bold Alphabet dies from Altenew on this one.


The challenge ends in one week on June 24 PST.  To see more inspirations, head on over to the challenge blog HERE.  Thank you for stopping by.  


May 30, 2022

Graduation

Hello everyone.  Today my eldest nephew graduates from university and I created this fun mini slimline graduation card for him.  


The skunk is from Skunks stamp set by C.C. Designs.  He was stamped with Memento Tuxedo Black ink on alcohol marker friendly cardstock, coloured with Copic Sketch markers and Polychromos pencils, then die cut out with the coordinating die.  The letters were die cut next with Reverse Confetti Letter Cuts dies from gold foil paper and black cardstock to offset for a drop shadow.  


A mini slimline panel was then die cut from mixed media paper using Mini Slimline die by Spellbinders.  Ran it through the diecutting machine with the Slim Pinpoint Burst Plate from Memory Box then ink blended gray and black dye inks around the edges, leaving the middle white to give it a glow effect.  The cap (retired) was die cut from gold foil paper and black cardstock as well.  Heat embossed the sentiments (retired) on black cardstock with white embossing powder, then trimmed into strips before assembling the card onto a split black/white mini slimline card base measuring 3.25”x 6.25” to finish.


Just like his birthday card, this may be a little too cute for a 22 year old young man, but this skunk with his thumbs up seemed like a good fit for the occasion. 😉  Too cute or not, I am one proud aunt!  Thank you for stopping by.  Have a wonderful week,


Challenges:

August 08, 2021

Guest Designer for AAA Cards Game#196

Hello everyone.  I am excited to be guest designing (GD) at AAA Cards this fortnight for their game #196 - Two Quarters + optional twist Favourite Colours.


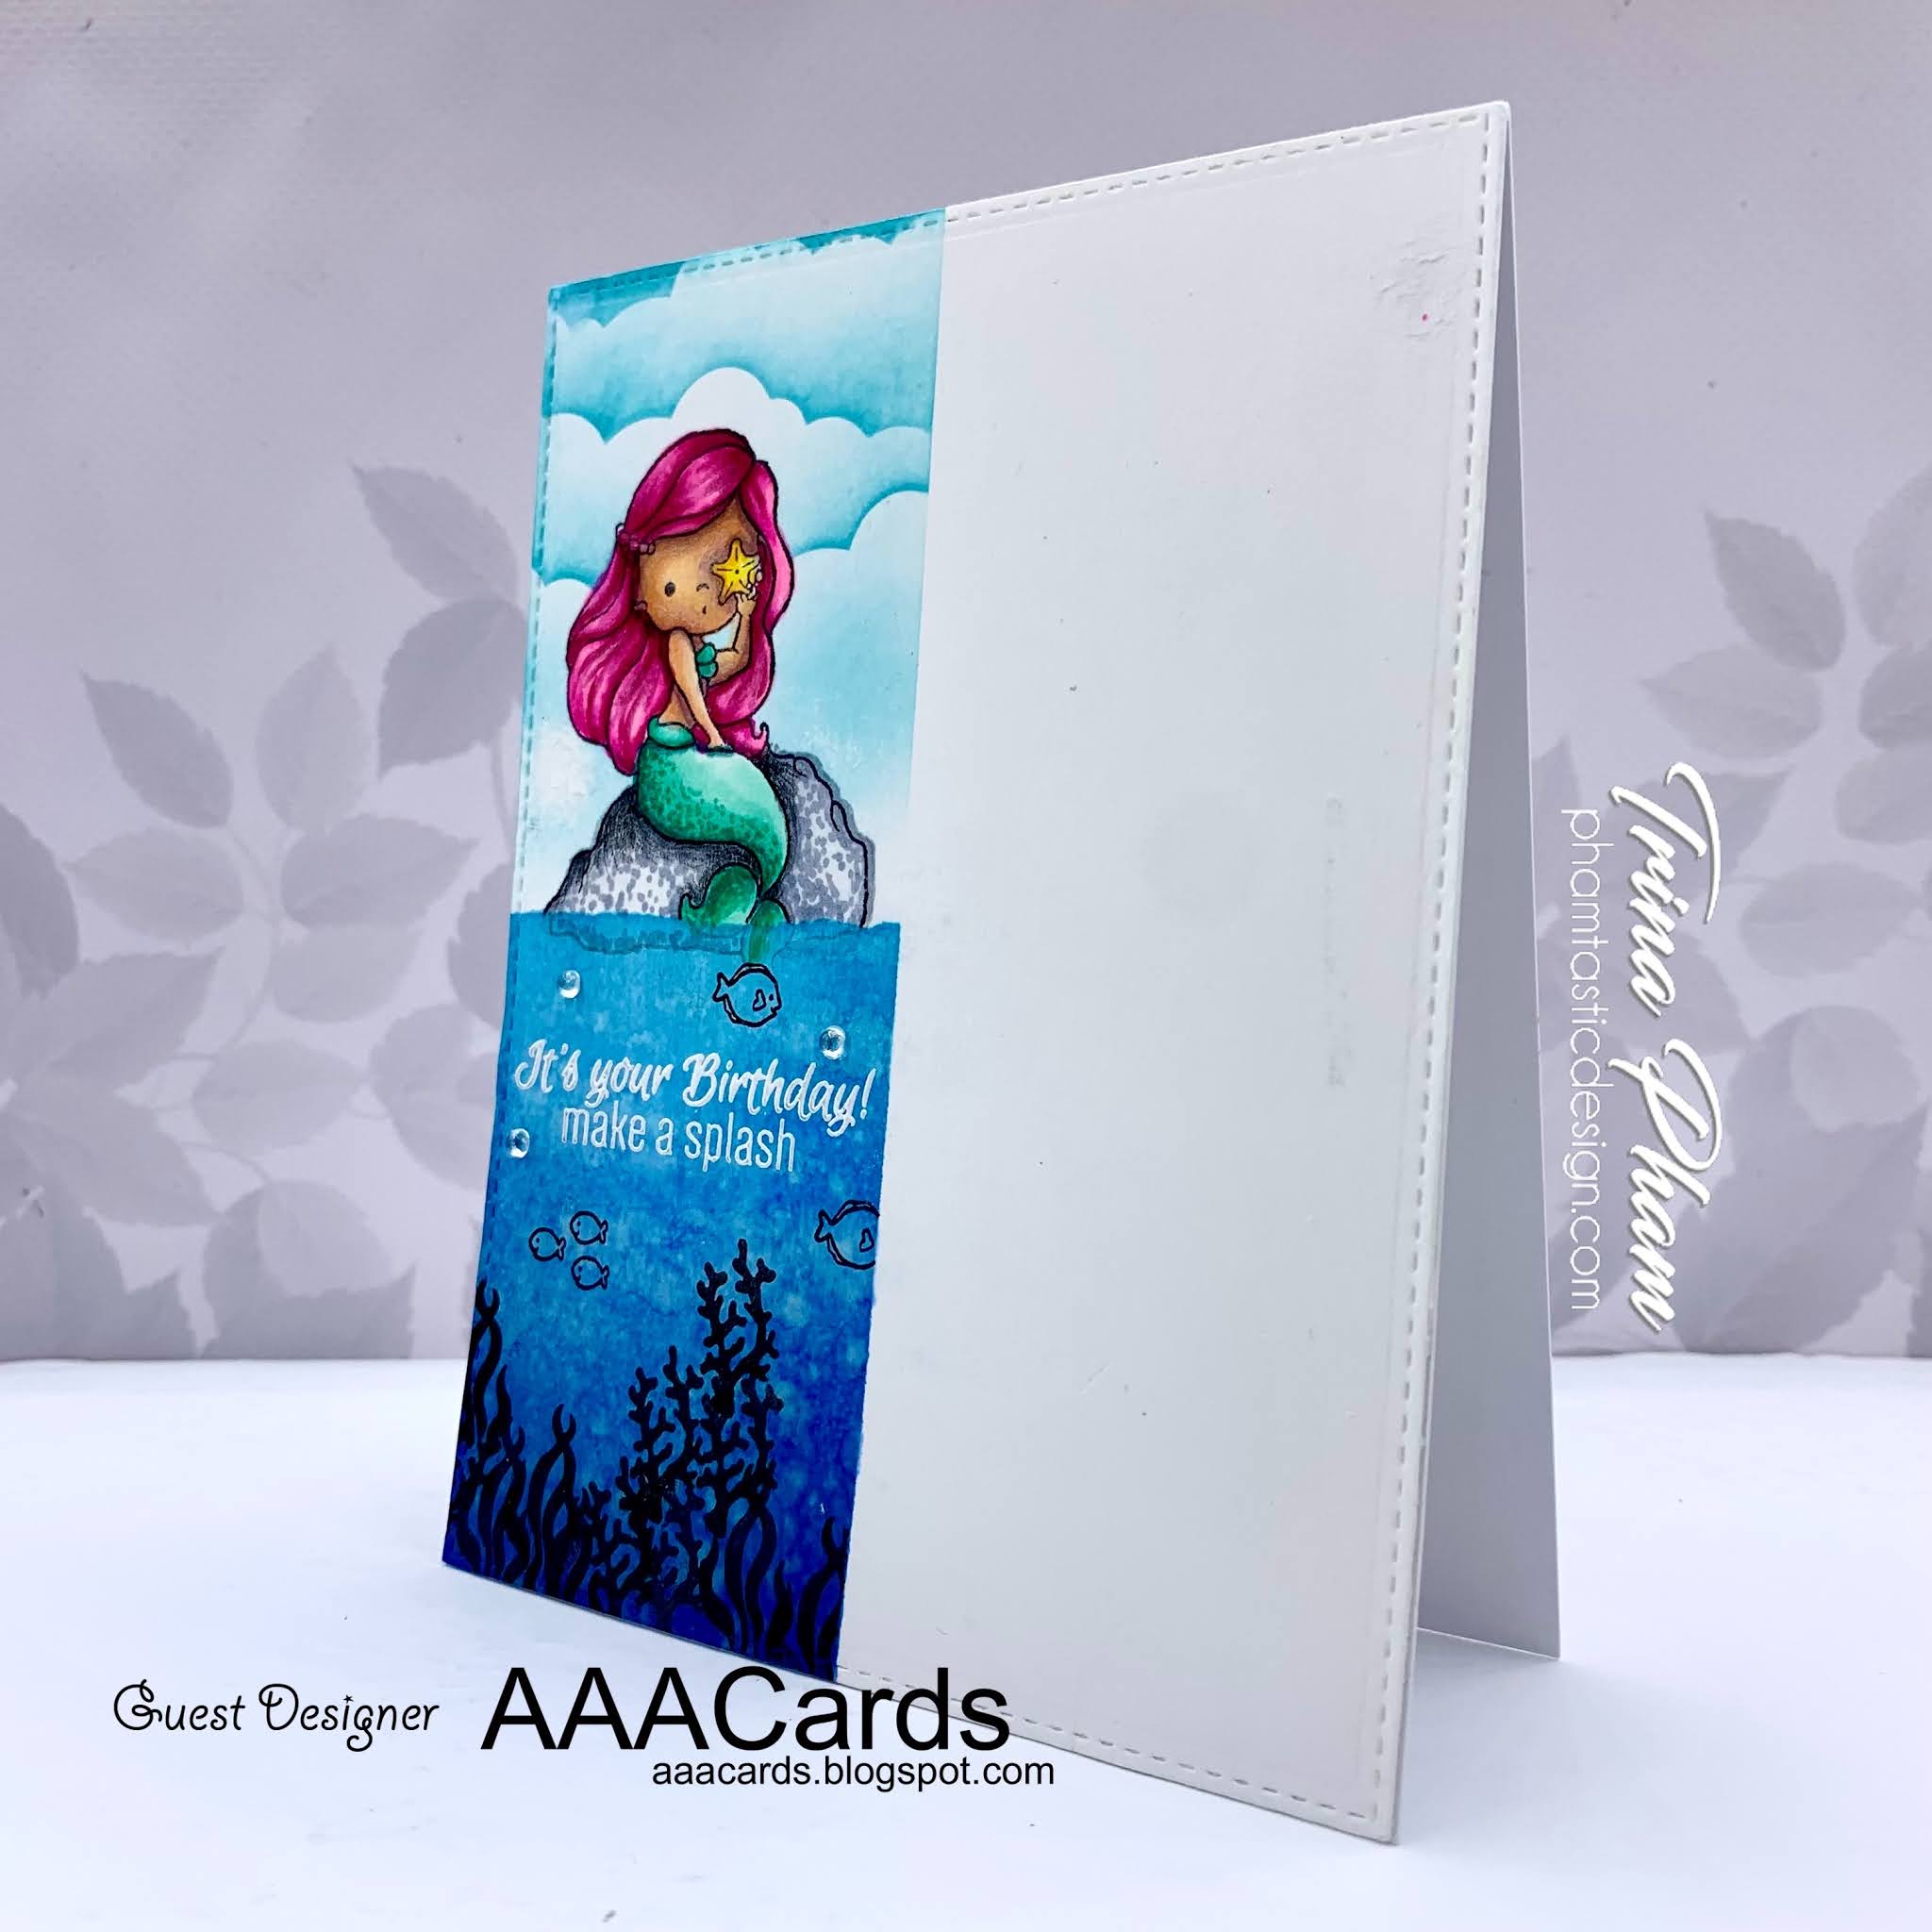
My favourite colour is blue, so I decided to do a water scene.  I thought about making it monochromatic, but ended up adding pops of colour… I do love a good rainbow after all, and almost turned it into a rainbow colour scheme. 😂  Anyway, I used Mermaid Kisses from SugarPea Designs to create my card. 


On a stitched A2 size (4.25”x5.5”) panel that was die cut from Xpress It cardstock, the right half (2-1/8”) was masked off.  The bottom left quadrant was masked off next, leaving the top left quadrant open to stamp the mermaid with Memento Tuxedo Black ink.  Coloured her in with Copic markers then masked her to blend Tumbled Glass distress ink (DI) over a cloud stencil from Honey Bee Stamps Outdoor Scene Builder to create the sky. 


Masked the top left quadrant next to work on the water scene below.  Ink blended Salty Ocean and Prize Ribbon DI then splattered with water and blot with a paper towel to give it texture and movement.  Stamped the seaweed, coral and fish with Versafine Onyx Black ink.  Dried the panel with my heat tool before heat embossing the sentiment with white embossing powder.  Stamped the bottom of the rock with Memento London Fog ink to unify the scenes.  Embellished with a few clear Fairy Drops from Memory Box to serve as bubbles to finish.


I want to thank Jane and the AAA Cards team for having me.  For the guidance on what the challenge entails and to see the wonderful inspirations from the design team, click HERE.  Thank you for stopping by.


Challenges:


September 01, 2020

Happy Mail

Hello there.  My card today is two months overdue! 🙈  A thoughtful crafty friend surprised me with a hat trick (sports term when a player scores three times in a game) of happy mail including crafty goodies.  Long story short, I was finally able to make this card for her.  Hopefully, she will be pleasantly surprised when she receives it.


I couldn’t think of a better time to ink up a new NBUS stamp set called Happy Mail (so appropriate) from SugarPea Designs.  On a stitched slimline panel die cut from X-Press It cardstock, I stamped the single envelope with Memento Tuxedo Black ink, masked it, then stamped the penguin.  Coloured them in with Copic markers.  Masked them and the upper 2/3 of the panel.  Blended light gray dye ink with a blender brush to create the sidewalk.  Masked the sidewalk then applied green and turquoise dye inks for the grass/sky.  Took some green Copic markers and added grass shading and details.


The Impact Alphabet letters from My Favorite Things were each die cut twice from white and once from gold metallic foil paper and stacked for dimension.  For a shadow effect to make it stand out better, die cut each letter from black and offset.  Created the custom sentiment with some stamp surgery and strategic masking using the different sentiments in the set.  It was heat embossed with white embossing powder on black.  Mounted the panel to a white 3.5”x8.5” card base to finish.


Thank you for stopping by. Have a wonderful day!


Challenges:
The Sisterhood of Crafters - It’s the Thought that Counts (sentiment as the focal point)
The Paper Players - #506 Tic-Tac-Toe challenge from Ann (middle column metallic-embossing-thank you)
Crafty Animals - #42 Anything Goes Animals
Send a Smile 4 Kids - Thank you Cards or Anything Goes 4 Kids

August 27, 2020

Pop-Up Birthday Card Requested

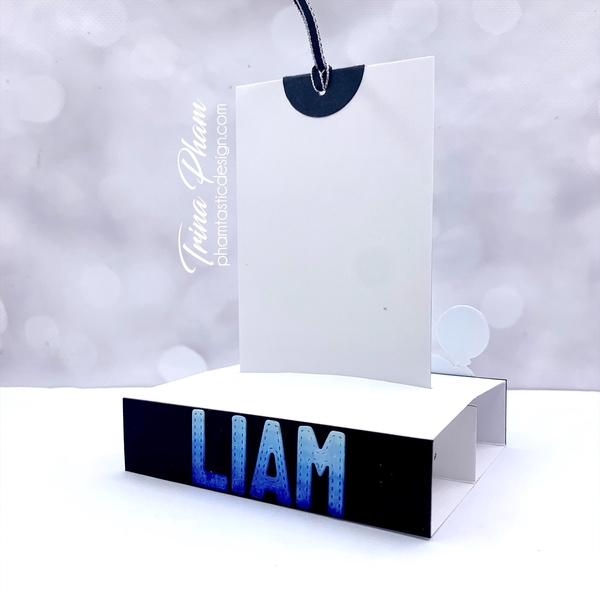
Hello there.  I can’t believe my nephew turned 5 today! 😱  A few weeks ago, he asked for a pop-up card.  I went old school and made him a free standing pop-up card following the tutorial HERE.  This is what it looks like collapsed to fit into an envelope.


Here it is “popped up”.

SugarPea Designs Chunky Monkey stamp set was used.  Stamping was done with Memento Tuxedo Black ink on X-Press It cardstock and colouring was done with Copic markers.  The sentiment from the same set was heat embossed with white embossing powder.


The images in the forefront were die cut out with the matching dies.  Masking was used for the images on the pull-up panel.  The background was created by blending turquoise dye ink with a blender brush over a cloud edge stencil.  Personalized his card by adding his name on the back using Vintage Varsity Alphabet dies from Memory Box.  

Even though he was expecting a pop up card, I think he was still pleasantly surprised and kept asking how it was made.  Told him it’s a trade secret. *lol*😂   Thank you for joining me today.  Have a wonderful weekend.


Challenges:
The Male Room - #141 7th Birthday
Papercraft - #61 Animals
Cupcake Inspirations - #500 Birthday Celebration
Stamping Sensations - August challenge Make It Masculine
Watercooler Wednesday - #286 Marsha’s challenge All About Occasions

July 03, 2020

Guest Designer for Just Us Girls Challenge #543 - Word Week: Rainbow


Hello there.  I’m so excited to be back as a guest designer at Just Us Girls (JUGS) for the month of July!  Thank you JUGS team!  The first challenge is word week and the word is Rainbow!


Those who know me know I love rainbow anything!  And after not being able to join in the Circles/Bubbles challenge at Twofer Challenge last month due to back issues again, I was thrilled to create one of the cards I had envisioned!  I used new NBUS Interlocking Circles die with an older Blow Me Away stamp set from SugarPea Designs for some rainbow bubble fun! 


Started by die cutting from X-Press It cardstock with the pierced rectangle die from SugarPea Designs Card Front Element Builder II.  Stamped the dragon in the bottom left corner with Memento Tuxedo Black ink, masked him then stamped the bubble wand in his hand.  To ground him, pounced Memento Tuxedo Black ink with a sponge dauber through a diagonal stripe stencil (discontinued) then black heat embossed the sentiment from the same stamp set.  Removed the mask and coloured in with Copic markers.


For the bubbles, the Interlocking Circles was die cut from the panel and twice from Bristol paper then stacked for dimension.  Took a piece of Bristol paper next and ink blended Squeezed Lemonade, Picked Raspberry, Mermaid Lagoon and Twisted Citron distress inks to create my rainbow.  Spritzed it with a sparkle spray, but then decided to use acetate to get a better “translucent bubble” look instead.  A piece of acetate backed the opening.  Adhered the inked rainbow piece directly to the card base then added the panel on top.  Inlaid the stacked Interlocking Circles to finish.


Now it’s your turn to show off your rainbow creations and join in the fun!  More inspirations from the design team can be seen HERE.  Happy 4th of July to my American neighbours to the south.  Thank you for stopping by.  Enjoy your weekend.


Challenges:
Crafty Animals - #40 July Anything Goes Animals
The Male Room - #139 Use Die Cuts
Seize the Birthday - #194 Anything Birthday Goes optional Red White and Blue (no twisting)
The Sisterhood of Crafters - Stencilling
Love to Craft - #48 July Anything Goes

April 15, 2020

CAS Christmas April Reminder - Christmas Song

Hello there!  Welcome back to my third and final post of the day!  It’s another reminder post and this time it’s for the Christmas Song challenge at CAS Christmas.


Truthfully, the song I had in mind was “Santa Claus is coming to town” because I wanted to use a NBUS (already discontinued) die called Our Town from My Favorite Things.  Unfortunately, I couldn’t find it or I mistakenly thought I had one. 🤔   But I found a good substitute and created this simple card.  


Started by masking the moon with a circle die-cut in the top left corner of an A2 sized Bristol panel.  Using blender brushes, ink blended Tumbled Glass, Salty Ocean and Blueprint Sketch distress inks to create the sky.  Allowed it to dry overnight to ensure it’s completely dry before black heat embossing Santa and his sleigh from Lawn Fawn’s Winter Skies.


Next, the cityscape was die cut first from a 2” high black strip.  The second was an offset cut from a Bristol piece to stagger the buildings.  Adhered the black one to the inked background then splattered with white gouache paint for snow.  Black heat embossed the sentiment from Sugar Pea Designs Here Comes Santa Claus on the white die-cut.  Once assembled, spritz the entire scene card with a sparkle spray for some shimmer to finish.


Whew... and that’s a wrap from me for today!  There are more inspirations over on the challenge blog HERE.  The challenge closes April 24th PST.  Looking forward to seeing you in the gallery.  Thank you for visiting.  Stay home and craft on.


Challenges:
Merry Little Christmas - #21 April Anything Christmas Goes
Christmas Kickstart - #30 Winter Wonderland (Create a Scene)
Alphabet Challenge - A for Anything Goes
Watercooler Wednesday - #267 Karen’s Challenge: Anything Goes with a Masculine Twist