Showing posts with label CAS. Show all posts

August 10, 2026

Charming Delight Birthday

Hello everyone.  Today is a friend's birthday and I created a CAS (clean and simple) floral birthday card for her using the Charming Delight layering stencil set from Altenew (ALT)   Hope she's having a wonderful day and getting spoiled. 😉  


Trimmed Bristol paper to A2 size then ink blended ALT Enchanted Garden and Frosted Foliage fresh dye inks over the stencil layers for the flowers and foliage. For the center, used distress inks (Squeezed Leminade, Scattered Straw, Fossilized Amber) and purple ink remaining from the Enchanted Garden detail blending brush.


Was going for a soft watercolour look, so had to add splatters with diluted white gouache paint.  Die cut the Spellbinders Layered Happy Birthday sentiment from silver foil paper and its shadow from vellum.  Assembled the card onto a white card base to finish. Easy peasy! 


Main products used for my card are linked below for your convenience.  Please note compensated affiliate product links have  been used in this post when possible at no extra cost to you should you make a purchase through them. Your support is much appreciated. Thank you for stopping in. .   


Challenges:
Time Out - #319 Choose Two (CAS-Floral-Birthday)  

July 24, 2026

Jolly Snowman

Hello there.  It's still Christmas in July, and I have a CAS (clean and simple) Christmas card to share using an oldie, but goodie stamp from Purple Onion Designs (POD).   For those not familiar with this cutie, meet Jolly (snowman looking up).  


Jolly was stamped with Memento Tuxedo Black ink on X-Press It paper, coloured with Copic Sketch markers then masked.  Ink blended Water Hyacinth fresh dye ink from Altenew (ALT) then die cut the panel down with the Blanket Stitched Rectangle from Pinkfresh Studio (PFS) for a decorative edge.  

Copic markers used:
carrot nose - YR12/16/23/27, E08 
scarf/pocket - B60/63/66 
twig arms - E31/25/29 
buttons - N7 
snow/shading - B0000/000/00, C00/0/1


And I couldn't think of a more appropriate greeting wish (retired Poppy Stamps) from Jolly. 😉  It was black heat embossed using Versafine Onyx Black ink and clear glitter embossing powder for a bit of sparkle.  Adhered the panel onto a white card base then added falling snow with a white gel pen to finish. 

Please note compensated affiliate links are used in this post at no extra cost to you should you make a purchase through them.  I appreciate your support.  Thank you for stopping by. 


Challenges:
Simply Clean & Simple - AG CAS + optional Birthday (creative licence - Jesus' birthday? 😁)

May 10, 2026

Whimsy Stamps - Sending Love Mother’s Day

Hello… and happy Mother’s Day to all the moms and mother-figures who are being celebrated today!  On that note, I have a Mother’s Day card to share today using products  from Whimsy Stamps (WS).  


The images from Raccoon Happy Day and Postal Minus were stamped with Memento Tuxedo Black ink on X-Press It paper, coloured with Copic Sketch markers then fussy cut out.   

Copic markers used:
raccoon - C3/4/5/6/7 
envelope - C00/1/2, R46 


To ground the images, dark gray ink was blended onto a Bristol panel.  “Happy” from Cue the Confetti and “mother’s day” from Happy Sayings were inked with Versafine Onyx Black ink and heat embossed with clear glitter embossing powder (EP).  Repeated the heat embossing for “sending love”, except inked it with a black and red water based markers then with VersaMark for the EP to stick to.  To give subtle interest to the background, ran the panel through my die cutting machine with the Floating Hearts cover plate.  Adhered  the card onto a white card base then added the image to finish.   


WS products used for my card are linked below. Please note compensated affiliate links have been used in this post at no extra cost to you!  Your support is greatly appreciated.  Thank you for dropping by.


Challenges:

August 06, 2024

Guest Designer for Try It On Tuesday Challenge - Keep It Simple

Hello everyone.   Still not crafting much due to health issues, but I’m excited to be a guest designer (GD) at Try It On Tuesday (TIOT) this fortnight for their KEEP IT SIMPLE challenge. 


I used Bee Happy stamp and Honeycomb Pattern die from Whimsy Stamps (WS) for a punny CAS (clean and simple) “bee-lated” birthday card.  


The bee was stamped with Memento Tuxedo Black ink on a scrap of X-Press It paper, coloured with Copic Sketch markers then fussy cut out.

Copic markers used:
yellows - Y000/11/15, V01
blacks - C5/6/8


Next, two white panels were trimmed to 5x3.75-inches.  The sentiments were stamped in black on one panel using the MISTI stamping tool.  The other panel was die cut with the honeycomb die, then glued on top of the other panel.  Inlaid the honeycomb, then placed it back into the MISTI to re-stamp the sentiments on top of the honeycomb.  Assembled the card onto a white card base and added clear shimmer to the wings for a bit of sparkle to finish. 


I want to thank Jo and the TIOT team for the GD opportunity.  For more inspirations from the design team and to link up your entry, click HERE.  Key products used/mentioned in making my card are linked below.   Thank you for dropping by.  


*affiliate links used when possible at no extra cost to you… thank you*


Challenges:
Seize the Birthday - #288 Tic Tac Toe (diagonal - stripes (bee), clean & simple, sentiment without the word birthday)

April 10, 2024

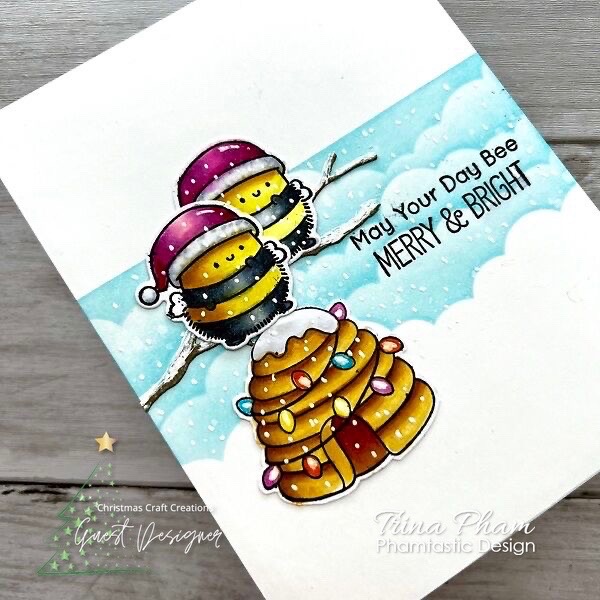
Guest Designer for Christmas Craft Creations April 2024 Challenge - Non-traditional Colours


Hello everyone.  I’m excited to be guest designing (GD) at Christmas Craft Creations (CCC) this month for their April Non-Traditional Colours challenge.  

*please note: affiliate links used in this post when possible at no extra cost to you… thank you!

Non-traditional colours to me means not red/green or red/gold.  I then remembered never before used (NBUS) Merry Bees-mas stamp and dies from My Favorite Things (MFT) and NBUS Bee Merry stamp from Clearly Besotted and inked them up for my card.  Let me introduce you to twin bees, Merry and Bright. 😂*lol*


The images were stamped with Memento Tuxedo Black ink on X-Press It paper and coloured with Copic Sketch markers.  The bees were die cut out with the matching die.  There is no die available for the beehive, so it was fussy cut out.  

Copic markers used:
yellows - Y11/13/15, V01 
blacks - C3/5/7/9 
pinks - RV10/63/55/09 
beehive - Y21, YR21/23/24/27 
lights - BG05, RV06, Y06, YR07 
shading - C00/1/3 


Next, masked the upper portion of an A2 size Bristol panel and ink blended Salvaged Patina distress ink over NBUS slimline cloud stencil (retired from MFT).  Lightly splattired with water and dabbed with a paper towel.  The Woodland Branch from Memory Box was die cut from brown cardstock.  Stamped the sentiment in black directly onto the panel, then assembled the card.  Added snow details with a white gel pen to finish.


I want to thank Charlotte and the CCC design team (DT) for this GD opportunity.  For inspirations from the DT and to link up your entry, please click HERE.  Thank you for stopping by. 


Challenges:
NBUS #61 - new stamps/dies/stencil 

November 24, 2023

Guest Designer for CAS on Friday Challenge #271 - Christmas

Hello everyone.  I’m delighted to be guest designing (GD) at CAS on Friday (CASF) this fortnight for their CHRISTMAS challenge.


The snowman image (retired Clearly Besotted Christmas Characters stamp set) was stamped with Memento Tuxedo Black ink in the middle of an A2 size alcohol marker friendly cardstock panel.  Masked it and the snowy ground using torn printer paper, then ink blended Picked Raspberry and Seedless Preserves distress inks for the background.


Coloured the image/scene in using the following Copic Sketch markers:

pinks - RV10/63/55 
hat - C4/6/9 
shading - C00/0/1/2 + 0  colorless blender
highlights - white gel pen 

The sentiment (retired My Favorite Things Itty Bitty Holiday Wishes stamp set) was stamped with Seedless Preserves distress oxide ink and heat embossed with clear embossing powder.  Adhered the panel onto a white card base, then added a few shiny snowflake sequins to finish.


I want to thank Janneke and the CASF team for this GD opportunity.  For more inspirations from them and/or link up your own CAS Christmas card, click HERE.  Thank you for stopping by.


Challenges: