Showing posts with label Spellbinders. Show all posts

August 10, 2026

Charming Delight Birthday

Hello everyone.  Today is a friend's birthday and I created a CAS (clean and simple) floral birthday card for her using the Charming Delight layering stencil set from Altenew (ALT)   Hope she's having a wonderful day and getting spoiled. 😉  


Trimmed Bristol paper to A2 size then ink blended ALT Enchanted Garden and Frosted Foliage fresh dye inks over the stencil layers for the flowers and foliage. For the center, used distress inks (Squeezed Leminade, Scattered Straw, Fossilized Amber) and purple ink remaining from the Enchanted Garden detail blending brush.


Was going for a soft watercolour look, so had to add splatters with diluted white gouache paint.  Die cut the Spellbinders Layered Happy Birthday sentiment from silver foil paper and its shadow from vellum.  Assembled the card onto a white card base to finish. Easy peasy! 


Main products used for my card are linked below for your convenience.  Please note compensated affiliate product links have  been used in this post when possible at no extra cost to you should you make a purchase through them. Your support is much appreciated. Thank you for stopping in. .   


Challenges:
Time Out - #319 Choose Two (CAS-Floral-Birthday)  

August 05, 2026

Believe

Hello there.  I'm back today with a CAS (clean and simple) Christmas scene card.  I love stretching my supplies and had an idea for the Spellbinders Snow Notes snowman.  He was singing his heart out when he got distracted. 😂 


The snowman pieces were die cut from X-Press It paper and black cardstock.  Colouring/shading on the white pieces were done with Copic Sketch markers then assembled him together when done.  

Copic markers used:
teal scarf - BG11/13/45/49 
white carrot - N0/1/2/3 
moon/snow - C00/0/1/2/3 


For the background, trimmed Bristol paper to A2 size and masked off the sides with 1" wide painter's tape.  A moon mask, die cut from masking paper with a Circle Infinity die, was then adhered to the panel before ink blending Faded Jeans and Chipped Sapphire distress inks (DI) for the night sky.  Removed the moon mask and added crater texture/details on the moon with Copic Sketch markers C00/1/2/3 


The Santa sleigh image and sentiment (both retired) were stamped with Versafine Onyx Black ink and heat embossed with clear glitter embossing powder for some sparkle.  Glued the snowman to the scene and with the side masks still in place, splattered the scene with diluted white gouache paint for a snowy effect.  The snowman gets splattered too because snow falls everywhere. 😉  Trimmed the sentiment to a strip then mounted the panel onto a white card base to finish. 


Please note compensated affiliate product links were used in this post when possible at no extra cost to you should you make a purchase through them.  I appreciate your support.  Thank you for coming by. 


Challenges:
Jingle Belles - Tree Skirt Tic-Tac-Toe (top row - snowman, glitter/bling, dry/heat embossing & bottom row - die cut/punch, santa, stamping) 

March 15, 2026

Guest Designer for AAA Colourful March 2026 Challenge - Colourboard #26


Hello everyone.  I’m delighted to be guest designing (GD) at AAA Colourful (AAACF) for their COLOURBOARD #26 challenge. 


I had planned on creating a personalized 80th birthday card for my FIL (father-in-law), but sadly, he passed away unexpectedly one day shy of this milestone and on his sons’  birthday (yep, hubby has a twin and they lost their dad on their birthday).  So I pivoted slightly and made the card generic instead.


The Celebration Balloons from Memory Box (MB) and box pieces from Spellbinders (SB) Birthday Wreath Add-on were die cut from Bristol smooth paper and ink blended with Speckled Egg, Stormy Sky, Faded Jeans or Lost Shadow distress inks (DI).  Tip: Leaving a highlight will give them dimension.  The sentiment was die cut from black cardstock and the back shadow piece from gold foil paper.  The streamers and stars, also from Birthday Wreath Add-on, were die cut from MB gold Festive Glitter paper,  


Next, Black Soot DI was ink blended around the perimeter of a dark gray panel.  Arranged and adhered the box and balloons onto it, then splattered with gold Metallic Watercolor for confetti.  Assembled the card onto a white card base then finished by adding shading with cool gray Copic Sketch markers (C0/1/2/3/4/5/6) to ground it. 

I want to thank Jane and the AAACF team for having me GD.  Please note compensated affiliate links have been used in this post when possible at no extra cost to you.  Your support is appreciated.   This monthly challenge is open till April 14, 2026, so plenty of time to enter!  Huope to see you in the gallery. Thank you for stopping by.


Challenges:

May 27, 2025

Guest Designer for Try It On Tuesday May 2025 Challenge - Things With Wngs

Hello everyone.  I’m delighted to be guest designing (GD) at Try It On Tuesday (TIOT) this fortnight for their THINGS WITH WINGS challenge. 


Here’s my card.


Nothing complicated here.  My card was created from only Bristol paper and ink blending with Wilted Violet distress ink.


All products, except for the Spellbinders Stylish Ovals, are from Memory Box.  These products are linked below. 


I want to thank Helen and the TIOT team for this GD opportunity.  Hope you join in the fun.  Thank you for stopping by. 


*affiliate links are used in this post when possible.  By clicking on these links and making a purchase, I will receive a small compensation at no extra cost to you.  Your support is appreciated*

Challenges:

October 01, 2024

Guest Designer for Color Hues Challenge #96 - Purple and Orange


Hello again.  I’m excited to be back with another guest designer post.  This time it’s at The Color Hues (TCH) for their PURPLE AND ORANGE challenge #96. 

*affiliate links were used in this post when possible at no extra cost to you… thank you*

It appears orange is a very popular colour this time of year. 😆  This colour duo screamed Halloween, but I went in a slightly different direction and created a fall birthday card.


I used never-before-used (NBUS) Build-a-Wreath die set from Spellbinders and die cut the branches/twigs and flower centers from brown cardstock.  The rest were die cut from white and ink blended with distress inks (DI) using various size blending brushes.  Highlights were added with a white Posca pen. 

DI used:
bow - Wilted Violet, Villainous Potion 
flower petals - Spiced Marmalade, ink remaining on an orange blender brush 
flower centers - Gathered Twigs, Black Soot 
leaves - Spiced Marmalade, Rusty Hinge


The sentiment from Hero Arts Let’s Celebrate was stamped with Wilted Violet distress oxide ink onto white woodgrain paper from Memory Box.  Assembled the card onto a white card base to finish.


I want to thank Nancy and TCH team for this GD opportunity.  To see more inspirations from the design team and/or to link up your entry, please click HERE.  Thank you for stopping by. 


Challenges:

August 25, 2023

Guest Designer for 52 Christmas Card Throwdown August 2023 Technique Challenge: Embossing Folder

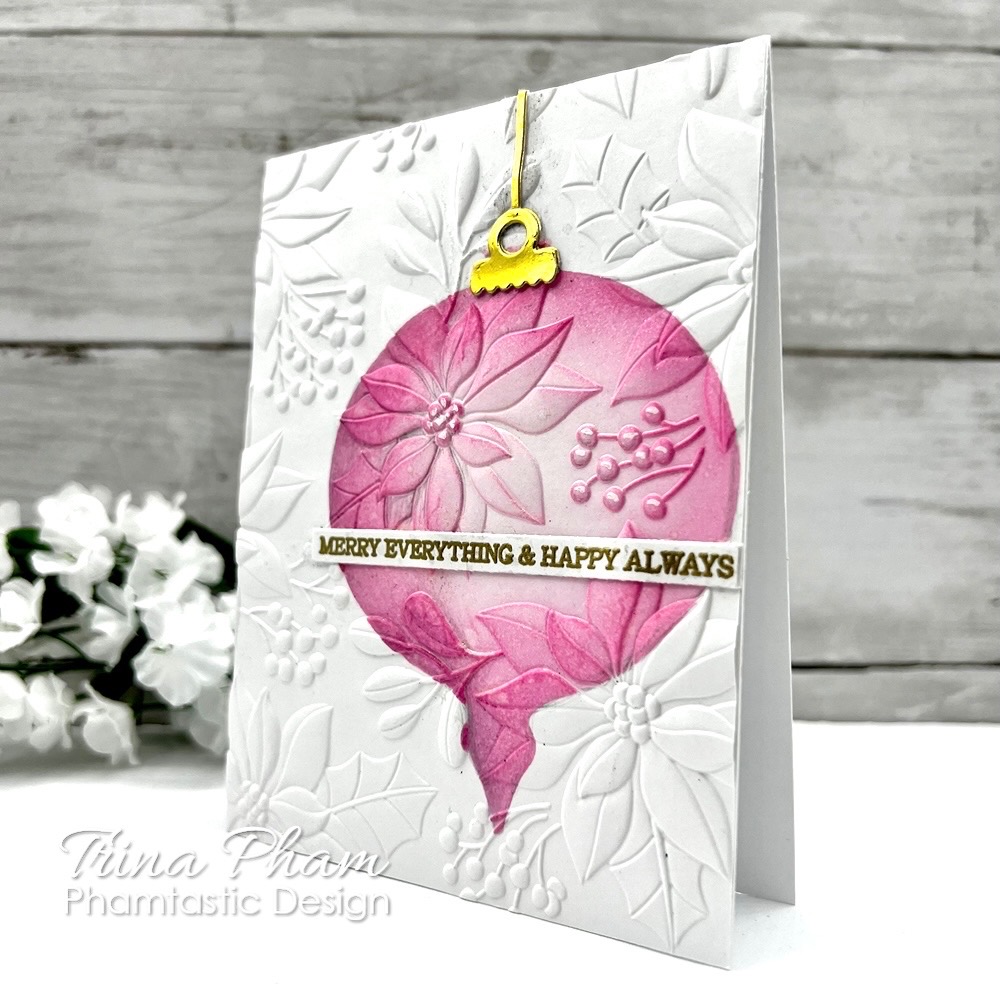
Hello everyone.  I’m excited to be guest designing (GD) this week at 52 Christmas Card Throwdown (52CCT) for their Embossing Folder technique challenge.  


My card used all never before used products (NBUS) including Scenic Poinsettia 3D embossing folder (EF) from Spellbinders with Infinity Ornaments dies, Holiday Sentiment Strips stamp and Sentiment Strips fancy die from Hero Arts.  Here’s my card.


Embossed a Bristol panel with EF.  Die cut a DIY ornament stencil from Masking Magic paper and adhered it to the panel.  Ink blended Spun Sugar, Kitsch Flamingo and Picked Raspberry distress inks through the stencil.  For some sparkle, spritz with a clear shimmer spray (could not capture it in a photo).


Heat embossed the sentiment with gold embossing powder next, then die cut it out into a strip with the fancy die.  Cut a string with paper trimmer and die cut attachment piece from gold foil paper.  Assembled the card onto a white card base to finish.


I want to thank Andreja and the 52CCT team for the GD opportunity.  For inspirations from the design team and to link up your entry, click HERE.  Hope to see you in the gallery.  Key products used for my card are linked below.  Thank you for stopping by.


*affiliate links used at no extra cost to you… thank you for shopping with me*

Challenges:
NBUS #53 - new EF, stamp and dies