Showing posts with label gouache. Show all posts

November 17, 2021

A Little Holiday Cheer

Hello there.  The 2021 Fall/Winter Coffee Lovers Blog Hop is ending soon…


…so I couldn’t pass up the chance to ink up NBUS (never before used) adorable Rory & Noelle (Winter Mouse & Squirrel on Log) stamp by Stacey Yacula from Purple Onion Designs (POD) to create a clean and simple (CAS) winter scene card.


Image was stamped with Memento Tuxedo Black ink on Xpress It cardstock and on masking paper.  Fussy cut masking image out to create the mask.  Used the Birch Tree Window die from Simon Says Stamp (SSS) next to die cut a stencil from masking paper.  Adhered the mask over the image, then positioned the DIY stencil on top and applied Salvaged Patina distress ink for the background.


Removed the stencil and mask, then coloured the image / scene in with Copic markers.  To ground the image better, white gouache paint was applied at the bottom of the log for a snowy ground.  The sentiment from POD Holiday Messages was stamped with Versafine Onyx Black ink and then heat embossed with clear glitter embossing powder.  Die cut out with My Favorite Things A2 Stitch Rectangle Set 1 die, then mounted the panel with two pieces of white cardstock underneath for a bit of dimension.  Used a white gel pen to add falling snow to finish.


Thank you for stopping by.


Challenges:
SSS Flickr - #188 Creating for the Holidays   (SSSFlickrchallenge#188) 

July 21, 2021

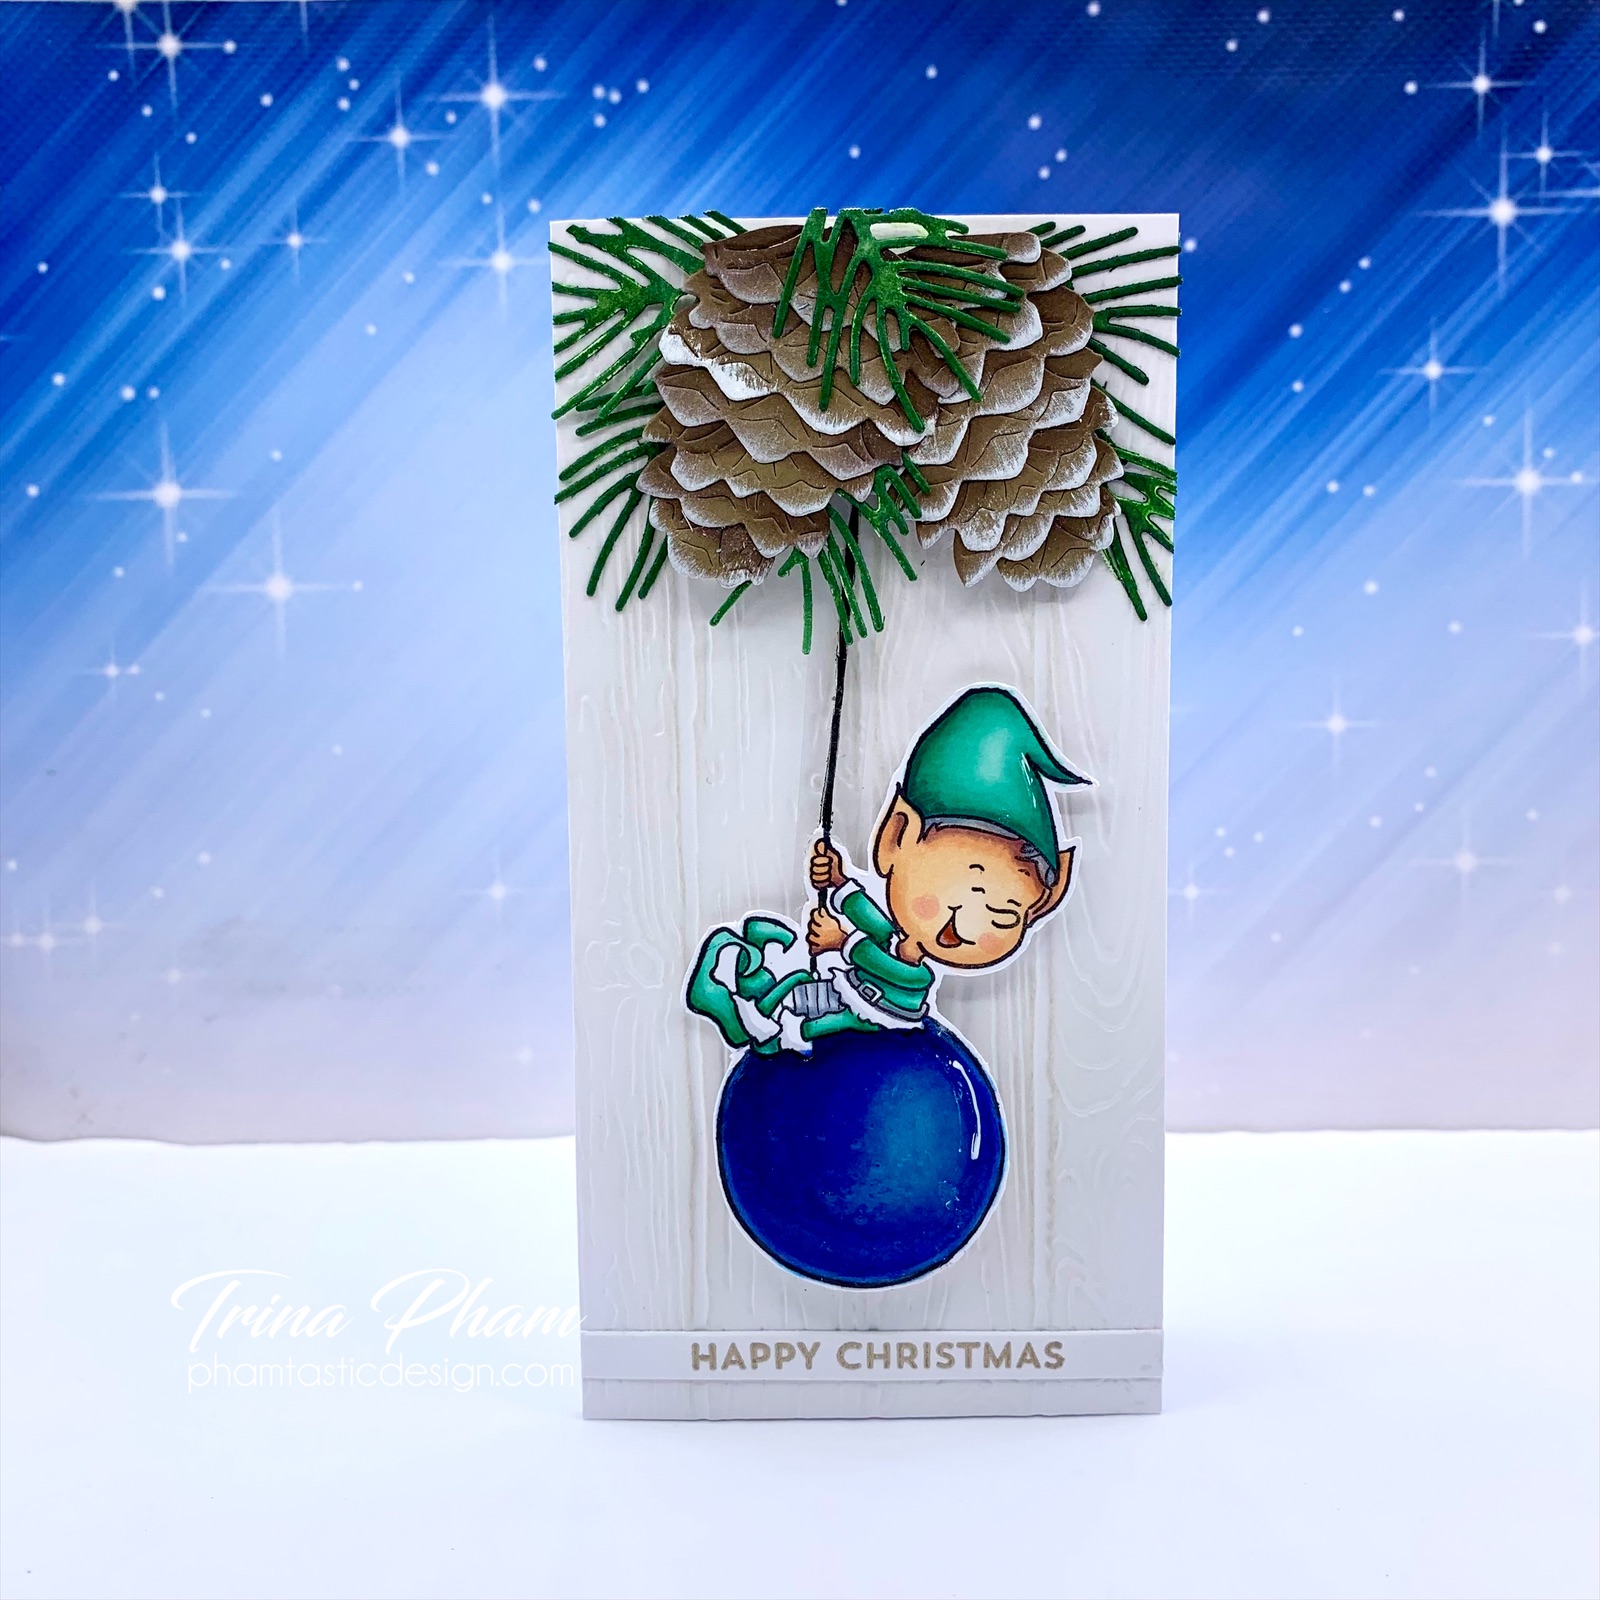
Happy Swinging Christmas Elf

Hello there.  I have a fun interactive mini slimline Christmas card to share today.  When I saw the Treat Yours-Elf stamp set from Kraftin’ Kimmie, I immediately pictured a pendulum swing card using the smiling male elf image.  And after many months 🙈, I finally made it!  I created the card from memory, but originally I watched this video tutorial HERE.  I’m sure if you do a google search, there are many other options.


The image was stamped with Memento Tuxedo Black ink onto Xpress It cardstock and coloured in with Copic markers.  Used a black marker to extend the string.  To give support, glued it to thick white cardstock, then fussy cut it out.  To strengthen the string portion, it was glued to medium weight acetate. The dry embossed wood panel from my stash was trimmed to 3x6 inches and this panel is where the swing mechanism was created from.  


The pinecones and pine branches are from Memory Box Pinecone Stackers and Forest Pine Branch, respectively.  The pinecone layers were die cut from brown cardstock and a sponge dauber was used to apply white gouache paint to the edges.  To colour the pine branches, Rustic Wilderness distress ink was applied directly to them.  Lightly spritz with water and pat with a paper towel. 


The sentiment from My Favorite Things Bitty Holiday Wishes was heat embossed with Liquid Platinum embossing powder.  Assembled the card onto a white 3x6 inch card base using foam tape and making sure not to impede the swing mechanism.  Nuvo Crystal Glaze on the bauble for some shine finished off the card.  And here’s a video showing it in action.


Thank you for stopping by.


Challenges:


July 15, 2021

CAS Christmas July Reminder - Poinsettia

Hello there.  This is the reminder post for the Poinsettia Challenge at CAS Christmas.


I used a new die set from Dee’s Distinctively for my card.


The poinsettia was die cut in three sizes from regular white cardstock and shaped with my fingers.  To help them hold their shape better, they were spritz with water and allowed to dry. 


Next, Cracked Pistachio distress oxide ink was blended onto a stitched Bristol panel and splattered with water, Rustic Wilderness distress ink and white gouache paint.  The mistletoes (Mistletoe Swags) and pine branches (Antique Pine Label) from Memory Box were die cut from Bristol paper.  The pine branches were coloured with Cracked Pistachio distress ink using the direct to paper method.

The sentiment from My Favorite Things Bitty Holiday Wishes was heat embossed with Liquid Platinum embossing powder.  Assembled the card onto a white card base, then added Memory Box Clear Jewels to the poinsettia center to finish.  

A quick reminder that the challenge ends on July 24 PST.  For more inspirations, click HERE.  Thank you for stopping by.


Challenges:

April 15, 2020

CAS Christmas April Reminder - Christmas Song

Hello there!  Welcome back to my third and final post of the day!  It’s another reminder post and this time it’s for the Christmas Song challenge at CAS Christmas.


Truthfully, the song I had in mind was “Santa Claus is coming to town” because I wanted to use a NBUS (already discontinued) die called Our Town from My Favorite Things.  Unfortunately, I couldn’t find it or I mistakenly thought I had one. 🤔   But I found a good substitute and created this simple card.  


Started by masking the moon with a circle die-cut in the top left corner of an A2 sized Bristol panel.  Using blender brushes, ink blended Tumbled Glass, Salty Ocean and Blueprint Sketch distress inks to create the sky.  Allowed it to dry overnight to ensure it’s completely dry before black heat embossing Santa and his sleigh from Lawn Fawn’s Winter Skies.


Next, the cityscape was die cut first from a 2” high black strip.  The second was an offset cut from a Bristol piece to stagger the buildings.  Adhered the black one to the inked background then splattered with white gouache paint for snow.  Black heat embossed the sentiment from Sugar Pea Designs Here Comes Santa Claus on the white die-cut.  Once assembled, spritz the entire scene card with a sparkle spray for some shimmer to finish.


Whew... and that’s a wrap from me for today!  There are more inspirations over on the challenge blog HERE.  The challenge closes April 24th PST.  Looking forward to seeing you in the gallery.  Thank you for visiting.  Stay home and craft on.


Challenges:
Merry Little Christmas - #21 April Anything Christmas Goes
Christmas Kickstart - #30 Winter Wonderland (Create a Scene)
Alphabet Challenge - A for Anything Goes
Watercooler Wednesday - #267 Karen’s Challenge: Anything Goes with a Masculine Twist

Jane’s Doodles Challenge #8 - Add Embellishments

Hello everyone.  My blog is going to be busy today with not one, not two, but three posts! 😂  I’m starting things off with the next Jane’s Doodles challenge and it is to Add Embellishments on your projects.


While setting up my craft space after the restoration, I came across some old jewel rhinestones.  They remind me of diamonds and my mom loves diamonds, so those two thoughts inspired this back-handed compliment Mother’s Day card.  So fun! 😂


That particular sentiment in the Jane’s Doodles Mother’s Day set (currently being discontinued, but still available at a phenomenal price while supplies last) makes me laugh.  It was white heat embossed on a scrap of black cardstock and fussy cut out in the shape of a speech bubble.   I paired it with the cute girl image in a new unused Jane’s Doodles set I’ve had for a while called Read All About It.  She was stamped with Memento Tuxedo Black ink on Neenah 80 lb. cardstock and coloured in with Copics.  Because I have long hair, I altered her to reflect this.  She was then fussy cut out.


To highlight and make the rhinestones “shine” in the background, I did selective ink blending with a blender brush and Picked Raspberry distress ink using a new Fractal Diamond stencil from Memory Box.  The Altenew Bold Alphabet letters were die cut from SU!’s Melon Mambo and black cardstock for the shadow.  Assembled the card onto a white card base to finish.


I hope my mom will understand the humour and smile.  Now it’s your turn to join in the fun.  Come play along for your chance to win a $30 gift card to the Jane’s Doodles store!  Thank you for dropping in.  Stay home and craft on.


Challenges:
Send A Smile 4 Kids - Cards 4 Moms (from kids) or AG 4 Kids
Alphabet Challenge - A for Anything Goes
NBUS #13 - new stamp set and stencil

August 25, 2019

Birthday Blast

Hi there!  My youngest nephew turns 4 in a couple of days, but his party was today.   I made this card for him and his eyes opened wide as he exclaimed, "It's an ASTRONAUT!"  He sure knows how to put a big smile on his auntie's face! 😊


I used just the Space Explorer stamp set for this card.  Started by stamping the rocket with black Copic friendly ink on Copic friendly cardstock, then masked it.  I swapped out the balloons so he can go on a little rocket ride.  Did this by masking the balloons directly on the stamp itself before inking the astronaut image, then stamped him.  Masked him before starting on the background.  Ink blended Salty Ocean, Chipped Sapphire and Black Soot distress inks (di) with blending brushes for a glowing trail effect.  


White heat embossed the sentiment within the trail and added Salty Ocean to make it pop and to give it that glow as well.  Splattered with white gouache paints then added some shining stars also along the trail with a white gel pen.  Normally, I don't use glitter on masculine cards, but this background was calling for it, so it was spritz with a Sparkle spray.  Removed the masks and coloured in the images with Copics.  Adhered the panel to a white card base to finish.


Thank you for stopping by.  Have a. wonderful week.


Challenges:
Watercooler Wednesday - #235 Marsha's Masculine Anything Goes
The Male Room - #118 Flight
AAA Birthday - #4 For the Boys
My Favorite Things - Color Challenge 124
Penny Black and More - August For Boys and Men


August 14, 2019

Birthday Chaos

Hello there.  I'm back to share a CAS birthday card made for my friend Christine.  Last month she introduced me to gouache paints.  I came home with one successful card (see this post), but the other one was a mess. I was ready to toss it when I figured I had nothing to lose so tried to salvage it.  Well, it worked!  Honestly, I didn’t think it would so it never occurred to me to take a before photo - whoops!


Started by stamping the flower with white pigment ink on black cardstock, then coloured it with gouache paints.  After the colouring was complete, I went to re-stamp it, but the stamp was removed from the MISTI.  Christine attempted to line it up and white heat embossed it.  Well, we all know even with clear stamps, aligning an image perfectly is pretty much impossible.  As you can imagine, there were double outlines and uncoloured areas on the flower. .


What did I do?  I used a black permanent marker to cover up unwanted white lines, filled in the flower with Polychromos pencils and went over the outline with white gouache paints.  Then could you believe it?  I screwed up on the sentiment!  Definitely did not want to toss it after all that effort, so white heat embossed the sentiment onto a black scrap and covered up the other sentiment with it.  Clear shimmer on the flower finished off the card.


I guess in a round about way, Christine had a hand in creating her card. 😂   Well, that does it for today.  Thank you for visiting.


Challenges:


July 29, 2019

Gouache at Play

Hello again.  A super quick post to end the night.  As mentioned in my previous post today, I played with gouache paints last weekend and came home with two card fronts.  One of them turned out and that's the one I am sharing.


Stamped the Fluttering (retired) butterflies with black waterproof ink on mixed media paper and watercolored with gouache paints in rainbow colours.  Re-stamped the image to crisp up the lines.  Die cut the piece with an A2 sized stitched rectangle die.  White heat embossed the sentiment on a black strip.  Sprayed the entire panel with Sparkle spray for some shimmer and added a few clear sequins to finish.


Thank you for stopping by.


Challenges:
Seize the Birthday - #170 Rainbows


No Peeking Til Christmas

Hello there.  You must know it was bound to happen.  My favourite little penguin is back!  I actually had another card done, but it was too similar to a previous one, so I made this one instead.


Last weekend at a crafty playdate over at Christine's, we played with gouache (pronounced like squash, but with a "g" gwash) paints.  These are thick, opaque paints which can be diluted with water.  I don't know about you, but I cannot get a bright white when colouring with a white color pencil on color cardstock.  Well, problem solved. After stamping the penguin on Toned Tan paper with black ink, I used a small brush to paint the white areas with white gouache.  The white is actually white!...  except for the areas where shading was added. 😉  I made sure to use my MISTI so the image can be re-stamped.  Because this is not watercolor paper, very little water was used.


The rest of the colouring and shading were done with Polychromos pencils.  The sentiment (retired) was white heat embossed on black cardstock then die cut out with an elongated speech bubble die (retired).  Snow was added with a white gelly roll pen to finish.


That was fun.  Thank you for visiting.  Have a wonderful last week of July!


Challenges:
Christmas Kickstart - #15 Festive Things with Wings
ABC Christmas - N is for No Peeking
Send a Smile 4 Kids - Christmas in July 4 Kids
Crafty Gals Corder - #196 Christmas in July
Simply Less is More - #400 Small Images