Showing posts with label Simon Says Stamps. Show all posts

January 09, 2026

Guest Designer for 52 Christmas Card Throwdown January 2026 Colour Challenge - Kraft, Green, Gold

Hello everyone and happy new year!  It’s my first post this year and I’m excited to be a guest designer (GD) at 52 Christmas Card Throwdown (52CCT) for their Colour Challenge this month.


I was going in a different direction when I remembered my new Snowbell Bouquet dies, purchased in my latest order from Simon Says Stamp (SSS), would be perfect for these colours.  Plus, I LOVE snowdrops!


The snowbell stems and blossoms were die cut from green and white cardstock, respectively. Ink blended  Rustic Wilderness distress ink (DI) on the stems to give them dimension.  Trimmed watercolor paper to a 3.5” square and ink smooshed diluted Rustic Wilderness DI.  To complete the snowy background, splattered with diluted white gouache paint.  Adhered this piece onto white then matted it onto kraft.  Arranged and glued the snowbells on then added more white splatters.  Adhered the gold foil die cut Joyeux Noel sentiment to finish.  


A big thank you to the 52CCT team for giving me this GD opportunity.  Ready to join in the fun?  For more inspirations and to link up your entry head to the challenge post HERE. BHope to see you in the falkery! 
For easy reference, SSS products used to make my card are linked below. Please note that affiliated links have been used in this post at no extra cost to you.  I appreciate your support.  Thank you for stopping by. 


Challenges:
Vesela Hiska - #74 Ringing Bells (thanks Majda for the suggestion!) 


April 24, 2024

Guest Designer Reminder for Christmas Craft Creations April 2024 Challenge - Non-Traditional Colours

Hello there.  I’m back today to share my guest designer (GD) reminder card for Christmas Craft Creations (CCC) April challenge - Non-Traditional Colours.

please note: affiliate links were used in this post when possible at no extra cost to you… thank you!

I am loving layering stencils lately, so I pulled out the new Festive Poinsettia stamp and stencil sets from Alex Syberia Designs (ASD) to create my card.  I wanted to use it this past Christmas, but my order didn’t arrive in time.  Anyway, here’s my card. 


On Bristol paper, the poinsettia image was stamped with Fade Out ink for a no-line colouring look.   Next, coloured the image with two gradient colours of dye inks each in turquoise and grays using blending brushes.  Die cut the image out with an A2 Stitched Rectangle Set 1 die from My Favorite Things.  For some sparkle, applied clear shimmer to the poinsettia flower petals and for a bit of texture, splattered with diluted white gouache paint. 


Joyful by CZ Designs from Simon Says Stamp (SSS) was die cut from black glitter paper and its shadow from regular white cardstock.  Assembled the card onto a white card base, then added clear jewels from Memory Box to the poinsettia’s center to finish.


I would like to thank Charlotte and the CCC teams for having me GD.  For more inspirations and to link up your entry, please click HERE.  Thank you for stopping by.  


Challenges:
SSS Flickr - #222 April AG (SSSFlickrChallenge#222)


November 10, 2023

Guest Designer for 52 Christmas Card Throwdown November Colour Challenge - Kraft, Black and White

Hello there.  I’m excited to be back guest designing (GD) at 52 Christmas Card Throwdown (52CCT) for their November colour challenge - KRAFT, BLACK & WHITE.


This colour combo screamed masculine to me, so I used Christmas Greenery stamp set from Gina K Designs to create a simple masculine snowy scene card.  


The front row of trees were stamped with VersaMark ink and heat embossed with white embossing powder along the bottom of an A2 size Kraft panel.  Stamped a second row of trees with Kraft dye ink behind that row for a tone-on-tone.  Next, ink blended Kraft and black dye inks around the perimeter and above the trees for contrast.  Oops… went a bit heavier handed than planned. 🙈


Splattered with diluted white gouache paint for falling snow, and painted white gouache paint below the trees for the snowy ground.  For some sparkle, applied ink on the trees and ground with a VersaMarker, then heat embossed with clear glitter embossing powder.  Joyful by CZ Designs / Simon Says Stamp was die cut from white and its shadow from black cardstock.  Stamped the secondary sentiment (retired) with Versafine Onyx Black ink directly onto the panel.  Assembled the card onto a white card base to finish.


I want to thank Andreja and the 52CCT team for this GD opportunity.  For inspirations from them and/or to link up your card, click HERE.  Please note: affiliate links used when possible at no extra cost to you.  Thank you for stopping by.   


Challenges:

October 12, 2023

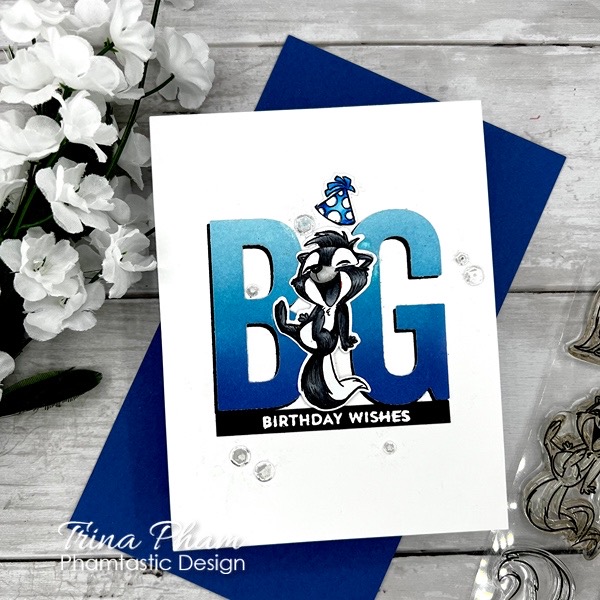
Big Birthday Wishes

 Hello there.  Now that my crafty friend has received it, I am sharing the simple birthday card I made for her.


This adorable skunk from the C.C. Designs Skunks stamp set has been in my stash since this card was made.  He was stamped with Memento Tuxedo Black ink, coloured with Copic Sketch markers C3/5/8/9, then die cut out with the matching die.  The hat from C.C. Designs Bears stamp set was also stamped with Memento Tuxedo Black ink, coloured with Copic Sketch markers B12/FB2/B28 then fussy cut out.


“Big” was die cut from Bristol and black paper using My Favorite Things (MFT) Big Birthday Wishes die.  Since blue 💙 is my friend’s (and mine 😉) favourite colour, the Bristol letters were ombré ink blended with Blueprint Sketch, Mermaid Lagoon and Tumbled Glass distress oxide inks.  The sentiment from Itty Bitty Birthdays (retired MFT set) was heat embossed on black cardstock with white embossing powder.  Assembled the card onto a white card base then embellished with Moonshine sequins from Simon Says Stamp to finish.


Products used for the card are linked below.  Thank you for stopping by.


*affiliate links used when possible at no extra cost to you… thank you for shopping with me*

Challenges:
Retro Rubber - #217 AG (skunks April 2022, Bears July 2022, MFT before 2021)

September 13, 2023

Guest Designer for Time Out Photo Inspiration Challenge #24 - Fall Camping


Hello everyone.  I’m excited to be guest designing this fortnight at Time Out (TO) for their photo inspiration challenge #247.


I must admit I struggled a little with this one since I don’t have anything shown in the foreground.  So I focussed on the fall colours and the scene behind the foreground and tried to re-create that view through the opening. 😉  Here’s my CAS (clean and simple) card.


The Birch Tree Window (retired Simon Says Stamp die) was die cut from a stitched white woodgrain panel in my stash and shading added to it with residual Black Soot distress ink (DI) remaining on a detail blending tool.  Gathered Twigs, Rusty Hinge, Speckled Egg, Iced Spruce and Tumbled Glass DIs were then ink blended with blending brushes on Bristol paper to create the scene behind the window.  A white gel pen was used to add ripples on the water.


The sentiment was foiled on black cardstock using Spellbinders White Opaque hot foil and Poppy Stamps Modest Greetings 1 hot foil plate.  It was die cut out with the included sentiment strip die and trimmed shorter.  Mounted the panel onto two pieces of thick white paper for a bit of dimension and assembled the card onto a white card base to finish.


This challenge is sponsored by Lawn Fawn, and the winner will receive a $25 gift card to their store as well as an invitation to GD on a future TO challenge.  To qualify, make sure to follow the challenge rules located on the right-hand sidebar of the TO challenge blog.  For inspirations from the design team and/or link up your project, click HERE.  

I want to thank Stephanie and the TO team for having me GD.  Affiliate links have been used when possible at no extra cost to you.  Thank you for stopping by.  Have a wonderful day.


Challenges:

May 01, 2023

Guest Designer for Colorful Options May 2023 Challenge - Blue

Hello everyone.  After being named the Designer Spotlight winner in March, I am so excited to be invited to guest design (GD) this month at Colorful Options (CO) for their May challenge, especially since this month’s colour is BLUE.  For those who may not know, blue is my favourite colour! 😉   Of course, if blue isn’t yours, you can always create a rainbow colour themed project instead to play along.  Here’s this month’s inspiration board.


And here’s my bright, blue birthday card.


Used a balloon die from Simon Says Stamp to die cut the balloons from white cardstock.  Blended Tumbled Glass, Mermaid Lagoon and Blueprint Sketch distress oxide inks (DOx) to colour them.  To give them dimension, made sure to leave a highlight spot.  Leftover ink from a black foam blending tool was used to add shading to the white balloons.


Took the Blanket Stitched Rectangle die from Pinkfresh Studio next to die cut an A2 size panel from light blue cardstock.  Arranged and adhered the balloons onto the upper 2/3 of the panel.  Splattered with diluted white gouache paint for a festive confetti look.  Die cut the Birthday Trio sentiment from Gina K Designs twice from thick white paper and stacked them together for dimension.  Assembled the card onto a white card base to finish.


I want to thank Makira and the CO team for having me guest.  For more inspirations from the CO design team and/or to link up your project, click HERE.  Hope to see you in the gallery.  Thank you for stopping by.


Challenges:
The Paper Players - #638 Tic-Tac-Toe Challenge from Anne Marie (diagonal: bright colors, die cuts, birthday)

September 03, 2022

CAS Christmas September Challenge - Sparkle and/or Shine

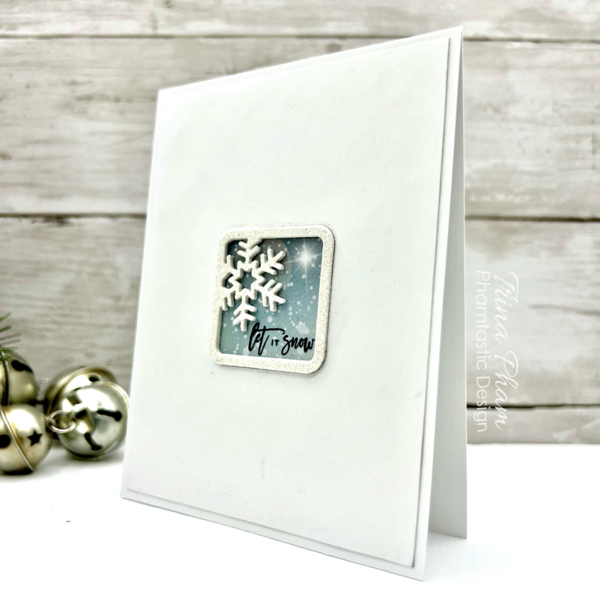
Hello everyone.  It’s time for the September challenge at CAS Christmas.  This month’s theme is SPARKLE and/or SHINE.


I wanted to see how CAS I could make my card so here it is!


I had several of these snowflake frames from Simon Says Stamp (SSS) Holiday Frames in my stash, so I stacked a few together and die cut another out of a scrap of white glitter paper from Memory Box Majestic Hues Glitter Pad. 


Took a Bristol panel also in my stash next and die cut the snowflake frame from it to create an opening.  It left another snowflake frame cutout, so added it to the stack for even more dimension.  Stamped the sentiment (retired) onto a piece of acetate with Archival Jet Black ink and adhered it behind the opening, which gives a lovely shine.  Thought about turning this into a shaker, but kept it simple and backed the acetate with a scrap piece of pattern paper from my favourite gorgeous Blurry Flurries paper pack by Whimsy Stamps.  Mounted everything to a white card base to finish.


Our guest this month is JoAnn (Crafty Nana’s Blog).  For more inspirations, head on over to the challenge blog HERE.  Thank you for stopping by.  Have a great day.