Showing posts with label GD - CO. Show all posts

September 01, 2025

Guest Designer for Colourful Options September 2025 Challenge - Anything Goes

Hello there.  I’m excited to be back as a guest designer (GD) this month at Colorful Options (CO) for their ANYTHING GOES (AG) challenge.

*please note: affiliate links were used in this post, so by clicking on them and making a purchase,I will receive a small compensation at no extra cost to you*

Can’t believe my nephew in this post is now a tween! I used products from Whimsy Stamps (WS) to make this card for him, but then realized it’s too young for him..  oh well. 🤷🏻‍♀️ 

Distress inks (DI) in rainbow colours.were ink blended through a die cut circle stencil in three areas on a Bristol panel.  The pandas from Panda Peekers were stamped with Memento Tuxedo Black ink on X-Press It paper, coloured with cool gray Copic Sketch markers then fussy cut out.  To have them “popping” out from the circles, they were then die cut with the same circle die used to create the stencil.  The paws of the top two pandas had to be fussy cut out and adhered to fit the circle. 


The “bears cool!” Punny part of sentiment was die cut from white and Iombré ink blended with Blueprint Sketch DI.  To define the “cool”  letters, Copic Sketch markers B0000 and FB2 were used.  The other part of the sentiment from Yeti Birthday was stamped with Blueprint Sketch distress oxide ink and heat embossed with clear embossing powder.  Adhered and assembled the card onto a white card base to finish. 


I would like to thank Makira and the CO team for having me join them again.  Play along
 in the fun and link up your project HERE.  Thank you for stopping by. 


Challenges:
Tic Tac Toe - #278 Featured Designer Felicita    (top row - Stencil, Birthday, Die Cut)

April 01, 2025

Guest Designer for Colorful Options April 2025 Challenge - Pastels

Hello there.  I’m delighted to be guest designing at Colorful Options (CO) for their April 2025 challenge   PASTELS… or a rainbow is always an alternative option. 


Spring is in the Air… at least in the northern hemisphere. 😉  So I decided to do both and created a simple pastel rainbow card using Whimsy Stamps (WS) products.

Thee rainbow and clouds were die cut from Bristol paper then ink blended with distress inks (DI).  Tge Pierced and Stitched Circles die set was used for the rainbow. 

DI used:
pinks - Spun Sugar, Picked Raspberry 
yellows + Squeezed Lemonade, Fossilized Amber 
greens - Twisted Citron, Mowed Lawn 
blues - Tumbled Glass, Salty Ocean 
purples - Shaded Lilac, Wilted Violet 
clouds - Lost Shadow 


For some sparkle, the rainbow and clouds were spritz with a clear shimmer spray.  It’s a shame the photo doesn’t pick up the pretty shimmer.  The sentiment was heat embossed with silver  embossing powder on an A2 size Bristol panel.  Adhered the rainbow and clouds, then stencilled the Twinkle Clusters with the inks remaining on the detailed brushes to finish.


I want to thank Makira and the CO team for this GD opportunity.  WS products used for my card are linked below.  Affiliate links are used in this post when possible at no extra cost to you.  Thank you for stopping by.


September 30, 2024

Guest Designer for Colorful Options October 2024 Challenge - Orange

Hello there.  I’m delighted to be guest designing (GD) this month at Colorful Options (CO) for their October 2024 challenge where the colour is ORANGE.  If this colour does not appeal to you, there is always the rainbow option.

*affiliate links used when possible in this post at no extra cost to you… thank you*

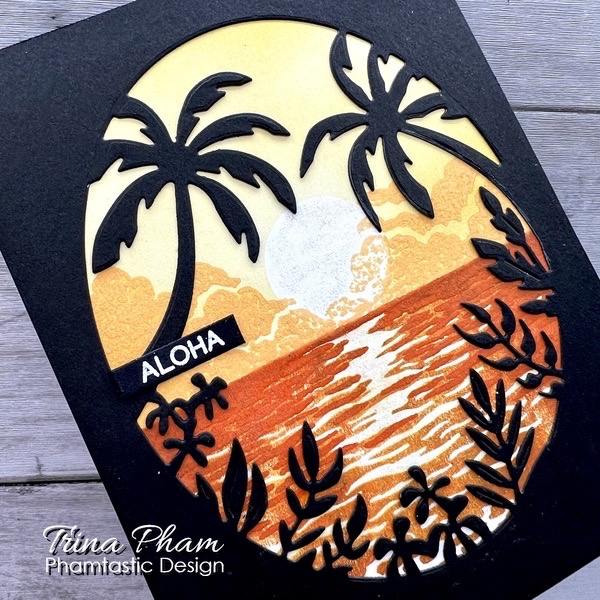
Ironically, I struggle with the orange colour and almost made a rainbow card. 😂  My first thought was to go the obvious autumn theme route, but then decided to put a couple of never-before-used (NBUS) Hero Arts (HA) products to work and stretch out summer.


Warm & Cosy crisp dye inks from Altenew were used to stamp the scene with the HA Color Layering Sunset Over Waves stamp set on Bristol paper.  A sun mask was die cut from masking paper next using a HA Circle Infinity die.  Stamped the water layers first, adhered the sun mask and ink blended leftover orange ink from a blender brush for the sky.  Removed the mask and stamped the clouds.  For a bit of sparkle, applied clear shimmer to the sun and the sunlight reflection trail in the water.


The Tropical Foliage Window was die cut from black cardstock.  The sentiment from Everyday Sentiment Strips was in my stash.  It had been heat embossed on black cardstovk with white embossing powder, then die cut out with the Sentiment Strips fancy die.  Assembled the card onto a white card base to finish. 


I want to thank Makira and the CO team for this GD opportunity.  For inspirations from the team and/or to link up your entry, please click HERE.  Hope to see you in the gallery.  Thank you for stopping by.


Challenges:
NBUS #67 - new stamp & die 


May 01, 2024

Guest Designer for Colorful Optiins May 2024 Challenge - Royal Blue

Hello there.  I’m excited to be back with a second guest designing (GD) post today.  This time it’s at Colorful Options (CO) for their May challenge where ROYAL BLUE is the colour of the month.  If you are not wild about that colour, a rainbow option is always available.  Here’s the challenge inspiration graphic. 


Ironically, GD this month at CO gave me deja vụ… check out my post from last May HERE to see why. 😉  Princess Kate wearing the gorgeous gown in the challenge graphic above was the inspiration this year and I used the new fashion products from Whimsy Stamps (WS) latest release to create this “truly fabulous darling” card. 😂*lol*


The dress from Fashion Dresses and accessories from Fashion Accessories die sets were die cut from blue and/or black cardstock.  Added shading/details to the blue pieces fittingly with Royal Blue Copic Sketch marker B28.  Tried to add some sparkle to the dress with a white gel pen… didn’t work as well as I had imagined. 😂*lol*   Stamped the fashionista from Slay the Day with Memento Tuxedo Black ink on X-Press It paper and coloured with Copic Sketch markers before fussy cutting out.  

Copic markers used:
skin - E00/11/53/04 
lips/eye shadow - B12, FB2, B28 
fur - C00/1/3 
grounding/shadows - C00/0/1/2/3/4/5 


The Fashion Dress Form was die cut from silver shimmer paper.  The marquee was die cut from an A2 size Bristol panel then the cutout ombré ink blended with Blueprint Sketch distress ink.  The marquee frame was die cut from silver foil paper.  Trimmed strips from silver foil paper for the shelves.  Grey dye ink was then ink blended over a Giraffe stencil on the Bristol panel for the cobblestone wall.  White heat embossed the sentiments on black cardstock, then assembled the card onto a white card base to finish. 


I want to thank Makira and the CO team for this GD opportunity.  For more inspirations and/or to link up your entry, click HERE.   To see the April release from WS, click HERE.  WS products used for my card are linked below.  Thank you for stopping by. 


*affiliate links used in this post when possible at no extra cost to you… thank you!

May 01, 2023

Guest Designer for Colorful Options May 2023 Challenge - Blue

Hello everyone.  After being named the Designer Spotlight winner in March, I am so excited to be invited to guest design (GD) this month at Colorful Options (CO) for their May challenge, especially since this month’s colour is BLUE.  For those who may not know, blue is my favourite colour! 😉   Of course, if blue isn’t yours, you can always create a rainbow colour themed project instead to play along.  Here’s this month’s inspiration board.


And here’s my bright, blue birthday card.


Used a balloon die from Simon Says Stamp to die cut the balloons from white cardstock.  Blended Tumbled Glass, Mermaid Lagoon and Blueprint Sketch distress oxide inks (DOx) to colour them.  To give them dimension, made sure to leave a highlight spot.  Leftover ink from a black foam blending tool was used to add shading to the white balloons.


Took the Blanket Stitched Rectangle die from Pinkfresh Studio next to die cut an A2 size panel from light blue cardstock.  Arranged and adhered the balloons onto the upper 2/3 of the panel.  Splattered with diluted white gouache paint for a festive confetti look.  Die cut the Birthday Trio sentiment from Gina K Designs twice from thick white paper and stacked them together for dimension.  Assembled the card onto a white card base to finish.


I want to thank Makira and the CO team for having me guest.  For more inspirations from the CO design team and/or to link up your project, click HERE.  Hope to see you in the gallery.  Thank you for stopping by.


Challenges:
The Paper Players - #638 Tic-Tac-Toe Challenge from Anne Marie (diagonal: bright colors, die cuts, birthday)