Showing posts with label ombré. Show all posts

May 01, 2024

Guest Designer for Colorful Optiins May 2024 Challenge - Royal Blue

Hello there.  I’m excited to be back with a second guest designing (GD) post today.  This time it’s at Colorful Options (CO) for their May challenge where ROYAL BLUE is the colour of the month.  If you are not wild about that colour, a rainbow option is always available.  Here’s the challenge inspiration graphic. 


Ironically, GD this month at CO gave me deja vụ… check out my post from last May HERE to see why. 😉  Princess Kate wearing the gorgeous gown in the challenge graphic above was the inspiration this year and I used the new fashion products from Whimsy Stamps (WS) latest release to create this “truly fabulous darling” card. 😂*lol*


The dress from Fashion Dresses and accessories from Fashion Accessories die sets were die cut from blue and/or black cardstock.  Added shading/details to the blue pieces fittingly with Royal Blue Copic Sketch marker B28.  Tried to add some sparkle to the dress with a white gel pen… didn’t work as well as I had imagined. 😂*lol*   Stamped the fashionista from Slay the Day with Memento Tuxedo Black ink on X-Press It paper and coloured with Copic Sketch markers before fussy cutting out.  

Copic markers used:
skin - E00/11/53/04 
lips/eye shadow - B12, FB2, B28 
fur - C00/1/3 
grounding/shadows - C00/0/1/2/3/4/5 


The Fashion Dress Form was die cut from silver shimmer paper.  The marquee was die cut from an A2 size Bristol panel then the cutout ombré ink blended with Blueprint Sketch distress ink.  The marquee frame was die cut from silver foil paper.  Trimmed strips from silver foil paper for the shelves.  Grey dye ink was then ink blended over a Giraffe stencil on the Bristol panel for the cobblestone wall.  White heat embossed the sentiments on black cardstock, then assembled the card onto a white card base to finish. 


I want to thank Makira and the CO team for this GD opportunity.  For more inspirations and/or to link up your entry, click HERE.   To see the April release from WS, click HERE.  WS products used for my card are linked below.  Thank you for stopping by. 


*affiliate links used in this post when possible at no extra cost to you… thank you!

October 25, 2019

Fabulous Blooms

Hi everyone.  I'm popping in to share a quick clean and simple (CAS) floral card.  I actually created today's card after another card scheduled to post tomorrow.  I recently purchased the gorgeous Hero Arts / Gina K Designs collaboration stamp set called Friendship Blooms.  While putting away my supplies after creating tomorrow's card, I had another simple idea for it.


This stamp image is large and to keep my card CAS, it was stamped off the edge with Amalgam black ink on hot press watercolor paper slightly larger than A2 size.  It would look fine left as, but I added shading with gray and black Polychromos pencils.  The panel was die cut out next with an A2 sized stitched rectangle die (retired).


The bold greeting was die cut from Bristol paper and blue ink was then blended on with a blender brush.  For some sparkle, it was inked with VersaMark and heat embossed with clear glitter embossing powder.  A few clear sparkly sequins finished off the card.


Easy-peasy.  Thank you for stopping by.  Have a wonderful weekend.


Challenges:
The Paper Players - #464 Clean and Simple Sentiment Focal Point
A Blog Named Hero - October Nature
The Flower Challenge - #37 CAS (Happy 3rd Birthday)
Uniko - #55 Anything Goes optional twist Autumn


October 08, 2019

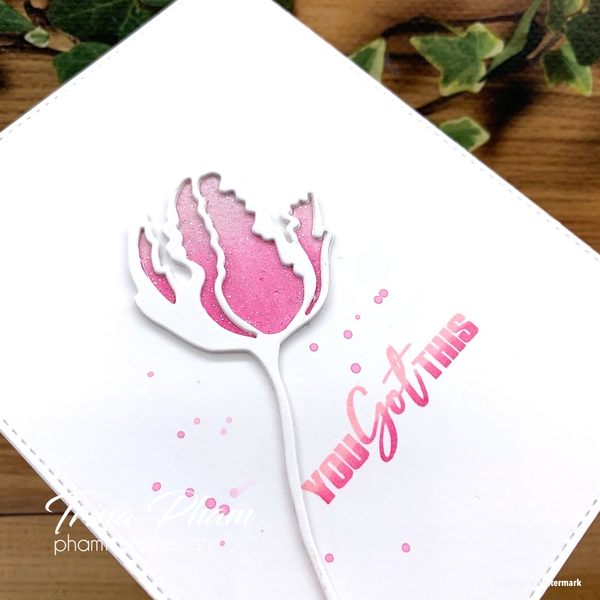
You Got This

Hello there.  I’m quickly sneaking in a CAS encagement card in support of breast cancer awareness.  I hope I never need to use it.


The sentiment was ombré inked with Spun Sugar and Picked Raspberry distress inks (di’s), then stamped onto a stitched Bristol panel from my stash.  Used my MISTI so it can be repeated a few times for a good impression.  Added Picked Raspberry di splatters to complete the background.


The Alexandra Renke tulip diecuts were from a crafty friend (thank you, Hideko).  Watercolored the inside pieces with the same di’s.  Inked them with VersaMark then heat embossed them with clear glitter embossing powder.  Took three of the outlines and stacked them onto the background panel.  Inlaid the watercoloured pieces to finish,


And that’s it... very simple.  Thank you for stopping by.


Challenges:
Time Out - #145 Breast Cancer Awareness
The Flower Challenge - #37 CAS
Uniko - #55 Anything Goes + optional twist Autumn   (breast cancer awareness month is in autumn)
Pixie’s Snippets Playground -  #362 Use Snippets


July 17, 2019

CAS Christmas July Reminder - Snowflake

Hi everyone.  This is the reminder post for the July Snowflake challenge at CAS Christmas.


And this is my CAS card.


I purchased a laminator in February to do some foiling and am finally trying it now.  My husband beat me to it and used it once to laminate a sheet.  The snowflake was heat embossed with clear embossing powder on Whisper White cardstock then foiled with Iridescent Deco Art foil.  I tried to capture the shine in the photo below.


I was planning to negative foil the sentiment to match, but my laminator quit working!  Very frustrating since this is my first time using it.  So instead, the sentiment was white heat embossed then ombre coloured with Faded Jeans, Salty Ocean and Tumbled Glass distress inks.  Added a Crystal Clear confetti circle to the centre of the snowflake to finish.


There is one week left to enter the challenge.  If you need more inspiration, check out what our guest Jane (Onions and Paper) and my team have created over on the challenge blog HERE.  Thank you for visiting.


Challenges:
Sugar Pea Designs - Mix It Up #57 
Merry Little Christmas - #12 July Anything Christmas Goes
The Cat's Pajamas - #359 Christmas in July
AAA Cards - #144 Maxi White Space optional twist Christmas in July
Mod Squad - Christmas in July

February 18, 2019

Celebrate an Occasion

Hello everyone!  I'm back to share a sweet card made with more new goodies from this past Christmas.  I normally gravitate towards blues, but I guess the cold weather has me heading towards the warm tones with this card.


Started by ink blending Spun Sugar, Picked Raspberry and Wilted Violet distress oxide (DOx) inks with mini blending tools on a stitched rectangle panel die cut from Mixed Media paper.  Flicked some water onto it and removed with a paper towel for texture.  For dimension and to create the "snow bank", applied white texture paste through a snowflake stencil.


Next, stamped the images with Copic friendly black ink on a scrap of X-press It cardstock, coloured them in with Copics, then die cut out with the coordinating dies.   Celebrate was die cut three times from Whisper White cardstock.  Ombre coloured one of them with Wilted Violet DOx ink and mini blending tool, then stacked them for dimension.  Assembled and popped the panel up onto a white card base with fun foam.  Added clear shimmer to celebrate to finish.


Initially, I was going to make this birthday specific, but then decided to use a generic sentiment to keep my options open.  Thank you for dropping by.  Have a wonderful week.


Challenges:
Freshly Made Sketches - #375 Sketch by Cecile
Watercooler Wednesday - #208 Charlotte's All About Occasions
Merry Little Christmas - #7 February Anything Christmas Goes
Love to Craft - #31 February Anything Goes
Addicted to Stamps and More - #328 Holiday
As You Like it - Favourite Birthday or Christmas... although I make birthday cards the most throughout the year, my favourite is making Christmas cards because it's my favourite holiday and there are so many fun products to play with


December 03, 2018

CAS Christmas December Challenge - Stars


Hello everyone!  I am excited to be hosting my first challenge over at CAS Christmas for the final challenge this year!  I have chosen Stars as the theme.  There are so many ways you can go with it.  Don't believe me?  Just check out the inspiring cards from our guest Cindy of Escape to Stamping and my team over on the challenge blog HERE.  And this is my card.


Started by die cutting the Holy Star twice from a scrap of thick white cardstock and once from a scrap of white glitter paper.  Stacked them for dimension.  Die cut Believe three times from more white scraps and ink blended Tumbled Glass and Blueprint Sketch distress inks on one of them.  Stack them for dimension again.


Next a white stitched rectangle panel was die cut from Whisper White cardstock.  An oval was then die cut in the centre of that.  Took the oval cutout and coloured it with a mini blending tool and Tumbled Glass, Blueprint Sketch and Chipped Sapphire distress inks.  Splattered with white acrylic paint for a starry look.  Adhered the stitched rectangle onto a white card base, inlaid the oval then added the diecut star and sentiment to finish.


That does it for me this year at CAS Christmas!  Due to it being a super busy time of year, this month's challenge is shortened and will end on December 15.  But that gives almost two weeks to get your entries in and complete any last minute Christmas cards or possibly get you started on next year's cards!  Hope you will join us.  Thank you for dopping by.  Have a happy holiday!


Challenges:
SSS Flickr Challenge - #111 Christmas/ Holiday Creations
CAS on Friday - #147 Make a Christmas Card
Inspirational - #175 Anything Christmas Goes
The Paper Players - #421 Theme challenge - It's Beginning to Look a Lot Like Christmas


September 27, 2018

Chubby Chum Christmas

Hello there.  I'm squeaking in tonight with a CAS Christmas card. 


On an A2 size piece of Neenah cardstock, stamped with Copic friendly black ink the hat, then masked it.  Stamped the puppy, then masked him.  Masked a slope, and blended Peacock Feathers distress ink for the background.  


Removed masks and coloured in the image with Copics.  Die cut warm wishes from white scraps three times and stacked them for dimension.  Ombre coloured it with the same red markers used to colour the hat.  Adhered the piece to a white card base then added snow with a white gel pen to finish.


And that's it!  Thank you for dropping by.  


Challenges:
Paper Smooches - September CAS
Jingle Belles - Let It Snow
ABC Christmas - S for Snow and T for Teal
Fab 'n Funky - #409 All Creatures Great and Small
Crafting by Designs - Get Ready For Christmas September Edition
Addicted to Stamps - #166 Christmas Comes Early
SSS Wednesday - Anything Goes
Send a Smile 4 Kids - Thanks or Fall Cards 4 Kids or Anything Goes 4 Kids