Showing posts with label rainbow. Show all posts

September 02, 2026

Simon Says Stamp - STAMPtember Party 2026!

Hello there. I'm joining Simon Says Stamp (SSS) today for their massive STAMPtember Party over on their blog. 😉 

For today's party, I created a simple rainbow friendship card usung the Flying Butterfly Collage dies, Embossed Card Edges dies and Forest Forage in Fall stamp (sentiment). 


Started by trimming two A2 size panels from Bristol paper.  Took one and die cut the butterfly and curved edge from it.  On the other panel, ink blended distress inks in rainbow colours.  For some subtle texture, splattered it with water and blot with a paper towel. 


The butterfly bodies were die cut from silver foil paper.  The sentiment was heat embossed on black cardstock using white embossing powder.  Adhered the panels together with foam tape for a bit of dimension then mounted it onto a white card base to finish. 


Besides tons of inspirations, there are numerous promotions available like this one. 


Compensated affiliate product links were used in this post at no extra cost to you should you make a purchase through them. Thank you for dropping by.


Challenges:
The Paper Players - #801 A Tic-Tac-Toe Challenge from Jayden (middle column -  things that fly, free, texture) 


April 08, 2026

Hero Arrs - Friends With Flaur

Hello everyone.  I have a fun card to share today featuring the Got Flair? die set and Totally Awesome stamp and cut bundle from the Friends With Flair collection released last month by Hero Arts (HA).  This collection is nostalgic… for those of a certain age, of course 😉.   Anyone owned a Jean jacket? suspenders? 🤔😂   Keeping with the retro vibe, I created a graffiti wall card.  


For the background, dark gray/black dye inks were ink blended over a Brick Wall stencil on Bristol paper, then splattered with diluted black gouache paint.  I’ve only used layering die sentiments when making graffiti word art cards, so using a stamped sentiment this time was a bit tricky.  I ended up heat embossing the sentiment with white embossing powder on black cardstock, die cutting it out with the coordinating die then coloured the raised white embossed sentiment with Copic Sketch markers.  The images were die cut from colour cardstock.  Ink blended the foam finger with a darker blue dye ink for an ombré.  Assembled the card onto a white card base then added details with a white gel pen to finish. 


HA products used for my card are linked below.  Please note compensated affiliate links were used in this post when possible at no extra cost to you.  I appreciate your support.  Thank you for stopping by. 


Challenges:


September 01, 2025

Guest Designer for Colourful Options September 2025 Challenge - Anything Goes

Hello there.  I’m excited to be back as a guest designer (GD) this month at Colorful Options (CO) for their ANYTHING GOES (AG) challenge.

*please note: affiliate links were used in this post, so by clicking on them and making a purchase,I will receive a small compensation at no extra cost to you*

Can’t believe my nephew in this post is now a tween! I used products from Whimsy Stamps (WS) to make this card for him, but then realized it’s too young for him..  oh well. 🤷🏻‍♀️ 

Distress inks (DI) in rainbow colours.were ink blended through a die cut circle stencil in three areas on a Bristol panel.  The pandas from Panda Peekers were stamped with Memento Tuxedo Black ink on X-Press It paper, coloured with cool gray Copic Sketch markers then fussy cut out.  To have them “popping” out from the circles, they were then die cut with the same circle die used to create the stencil.  The paws of the top two pandas had to be fussy cut out and adhered to fit the circle. 


The “bears cool!” Punny part of sentiment was die cut from white and Iombré ink blended with Blueprint Sketch DI.  To define the “cool”  letters, Copic Sketch markers B0000 and FB2 were used.  The other part of the sentiment from Yeti Birthday was stamped with Blueprint Sketch distress oxide ink and heat embossed with clear embossing powder.  Adhered and assembled the card onto a white card base to finish. 


I would like to thank Makira and the CO team for having me join them again.  Play along
 in the fun and link up your project HERE.  Thank you for stopping by. 


Challenges:
Tic Tac Toe - #278 Featured Designer Felicita    (top row - Stencil, Birthday, Die Cut)

March 10, 2023

Guest Designer for Hero Arts Stay Crafty with A Blog Named Hero March 2023 Challenge - Rainbow

Happy Fri-yay everyone!  I’m excited to be guest designing this month at Hero Arts (HA) Stay Crafty with A Blog Named Hero (ABNH) for their March RAINBOW challenge. 


I won the Peonies Bunch bundle in an Instagram (IG) giveaway last year (I think 🤔, or maybe it was before then 🤷🏻‍♀️) and finally inked it up to create a colourful birthday card for a crafty friend whose birthday was earlier this week. 


I don’t have the coordinating stencils for this set, but I don’t mind since I love to colour.  The image was stamped with Memento Tuxedo Black ink and coloured with my favourite Copic Sketch markers in rainbow colours. 

Copic markers used:
pinks - RV00, RV02, RV04, RV17 
reds - R02, R14, R27, R46 
oranges - Y17, YR04, YR09 
yellows - Y11, Y15, Y19, V01
aquas - BG10, BG01, BG05 
blues - B00, B12, FB2, B28 
purples - V01, V04, V17 
greens - YG01, YG06, YG09, G09
shadow - 0, C0, C1, C2


Colouring took up the bulk of the card, so once it was done, the card came together quite quickly and easily.  For some texture, splattered with diluted white gouache paint.  The sentiment from Let’s Celebrate was heat embossed with white embossing powder on black cardstock.  Adhered the panel to a white card base, then added clear shimmer on the flowers and a few clear sequins for some sparkle to finish. 


HA is generously giving away two $50 gift cards to their online shop.  One winner will be randomly selected and the other will be chosen by the design team.  Everyone has a chance to win!  Details and where to link up can be found HERE.  Hope to see you in the gallery.  

I want to thank HA and ABNH for the GD opportunity.  HA products used for the card are linked below.   Thank you for stopping by.


*compensated affiliate links used at no extra cost to you… thank you for your support*

Challenges:
NBUS #48 - new stamp

May 28, 2021

It’s a Slothy Birthday

Hello everyone.  I finally inked up a new stamp set from Time for Tea Designs called Be Slothy to create this colourful birthday card. 


The images were stamped with Memento Tuxedo Black ink on Xpress It cardstock, coloured in with Copic markers then die cut out with the coordinating dies.  The sentiment from My Favorite Things (MFT) Bitty Birthday Wishes was then heat embossed on black cardstock with white embossing powder.


Next, ink blended Squeezed Lemonade, Picked Raspberry, Salty Ocean and Twisted Citron distress inks (DI) at a diagonal on a scrap of white cardstock for a rainbow.  Covered it with VersaMark ink and heat embossed with clear embossing powder before die cutting it with the Skinny Upper Alphabet letters from The Stamp Market.  Die cut the letters again from black cardstock to stack and offset for a drop shadow.  


Lastly, stencilled a cloud background along the right edge of a Bristol stitched panel from my stash using Salty Ocean DI and a cloud edge stencil from Honey Bee Stamps Outdoor Scene Builder.  Assembled the card to finish.  

Thank you for visiting.  Have a wonderful weekend.


Challenges:

April 03, 2021

CAS Christmas April Challenge - Rainbow

Hello everyone!  Long time since my last post, but I’m back today with the new challenge at CAS Christmas.  This month we’re brightening up the gallery with clean and simple (CAS) Rainbow Christmas cards. 


Here’s my super easy CAS card.


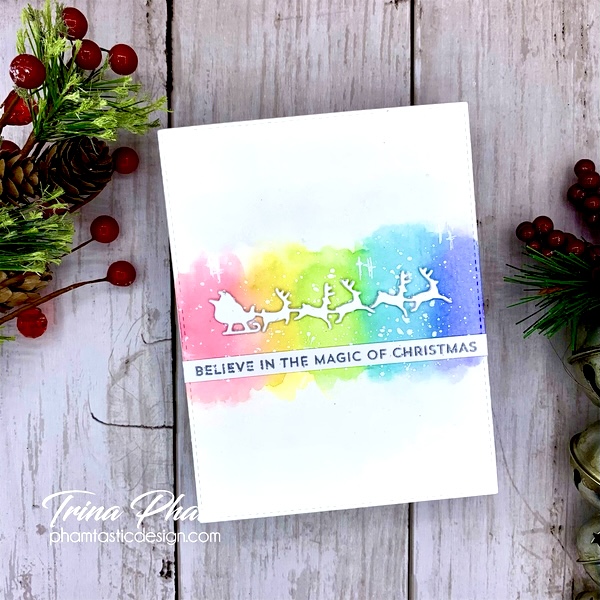
The watercolored rainbow background was created with Karin Brush Marker Pro using the wet-on-wet technique on a stitched watercolor panel from my stash.  The area was wet first with clean water, then I picked up the colours that were scribbled on a white board and added them in.  Splattered it with white gouache paint, then set aside to dry.


Next, Santa’s sleigh from Memory Box Cabin Snowglobe was die cut from Bristol paper several times and stacked for dimension.  The sentiment from My Favorite Things (MFT) Itty Bitty Holiday Wishes was then heat embossed with silver embossing powder on a strip of Bristol paper.  Assembled the card onto a white card base and added cross details with a white gel pen and clear shimmer to Santa to finish.


We have the wonderful Izzy (Izzy Scraps) as our guest this month.  She and the designers have made some beautiful rainbow cards to inspire you and you can check them out HERE.  The challenge ends on April 24th PST.  Hope to see your rainbow creations in the gallery.  Thank you for stopping by. 


Challenges:


July 03, 2020

Guest Designer for Just Us Girls Challenge #543 - Word Week: Rainbow


Hello there.  I’m so excited to be back as a guest designer at Just Us Girls (JUGS) for the month of July!  Thank you JUGS team!  The first challenge is word week and the word is Rainbow!


Those who know me know I love rainbow anything!  And after not being able to join in the Circles/Bubbles challenge at Twofer Challenge last month due to back issues again, I was thrilled to create one of the cards I had envisioned!  I used new NBUS Interlocking Circles die with an older Blow Me Away stamp set from SugarPea Designs for some rainbow bubble fun! 


Started by die cutting from X-Press It cardstock with the pierced rectangle die from SugarPea Designs Card Front Element Builder II.  Stamped the dragon in the bottom left corner with Memento Tuxedo Black ink, masked him then stamped the bubble wand in his hand.  To ground him, pounced Memento Tuxedo Black ink with a sponge dauber through a diagonal stripe stencil (discontinued) then black heat embossed the sentiment from the same stamp set.  Removed the mask and coloured in with Copic markers.


For the bubbles, the Interlocking Circles was die cut from the panel and twice from Bristol paper then stacked for dimension.  Took a piece of Bristol paper next and ink blended Squeezed Lemonade, Picked Raspberry, Mermaid Lagoon and Twisted Citron distress inks to create my rainbow.  Spritzed it with a sparkle spray, but then decided to use acetate to get a better “translucent bubble” look instead.  A piece of acetate backed the opening.  Adhered the inked rainbow piece directly to the card base then added the panel on top.  Inlaid the stacked Interlocking Circles to finish.


Now it’s your turn to show off your rainbow creations and join in the fun!  More inspirations from the design team can be seen HERE.  Happy 4th of July to my American neighbours to the south.  Thank you for stopping by.  Enjoy your weekend.


Challenges:
Crafty Animals - #40 July Anything Goes Animals
The Male Room - #139 Use Die Cuts
Seize the Birthday - #194 Anything Birthday Goes optional Red White and Blue (no twisting)
The Sisterhood of Crafters - Stencilling
Love to Craft - #48 July Anything Goes