Showing posts with label shaker card. Show all posts

February 01, 2025

Guest Designer for Color Hues Challenge #103 - Pink and Red

Hello everyone.  I’m delighted to be guest designing (GD) at Color Hues (TCH) for their PINK AND RED special collaboration challenge with Inkspiratiinal.


With it being February, these colours are geared towards Valentines, but I don’t really celebrate it, so I made a cute circle-shaped shaker card instead (no hearts) using products from Whimsy Stamps (WS). 

*affiliate links were used in this post at no extra cost to you… thank you for your support!*

The bear from Teddy Bear Christmas Eve (love stretching my supplies๐Ÿ˜‰) was stamped with Memento Tuxedo Black ink on X-Press It paper, coloured with Copic Sketch markers then die cut out with its matching die.  A white Posca pen was used to add details/highlights to the gifts. 

Copic markers used:
reds - R27/46 
browns - E50/51/53/55/57 


Used the Pierced and Stitched Circles die set to die cut the circle cutouts, frames and card base (did partial die cutting for this).  Backed the opening of the top frame with acetate, then stacked five frames underneath to form the compartment where the shaker bits are contained.  Treated the area with anti-static powder to help the bits to shake freely.  Stamped the Cosmic Swirl Background with pink dye ink and white heat embossed the sentiment onto red cardstock before assembling the card to finish.


I want to thank Nancy and TCH team for having me GD with them.  Remember this is an 2-for-1 challenge… create one card and link up to two challenges.  WS products used for my card are linked below.  Thank you for stopping by. 


Challenges:

October 27, 2023

Guest Designer for 52 Christmas Card Throwdown October 2023 Technique Challenge - Shaker Card

Hello there.  I’m excited to be back guest designing (GD) at 52 Christmas Card Throwdown (52CCT) for their SHAKER CARD technique challenge. 


Wanting to celebrate the late Janis Woolbright again this month over at Christmas Kickstart, I used On the Table and Peeking Friends (sentiment) stamp sets from Gerda Steiner Designs to create a CAS (clean and simple) CAT-mas (cat Christmas) tag shaker card. ๐Ÿ˜‰   


Started by stamping the Santa hat with Memento Tuxedo Black ink onto a scrap of alcohol marker friendly cardstock.  Masked it and stamped that fun cat face.  Removed the mask and coloured with Copic Sketch markers, then fussy cut it out.

Copic markers used:
hat brim/Pom Pom - C00/0/1/2/3 
hat - R14/27/37/39 
cat - W00/1/3/5, R81 


Stamped the sentiment with Versafine Onyx Black ink onto a scrap of Bristol paper and heat embossed it with clear glitter embossing powder.  Die cut it out with a tag dies (retired Blueprints 4 die set from My Favorite Things).  Die cut a second tag from Whimsy Stamps Blurry Flurries pattern paper for the backing.  Added acetate and foam tape strips to the back of the tag to form the shaker part of the card.  Did not have any ribbon, so die cut a bow from shimmer white cardstock using new-to-me Fit to be Tied die set from The Greetery.  Assembled the card onto white woodgrain paper adhered to a white card base to finish.


I want to thank Andreja and the 52CCT team for having me GD with them.  To see their card inspirations and/or link up your own Christmas shaker card, click HERE.  Thank you for visiting.


November 03, 2021

Guest Designer for The Male Room Challenge #156 - Gnomes


Hello everyone.  I’m excited to be joining the team at The Male Room (TMR) Challenge this month as their guest.  The theme is GNOMES.


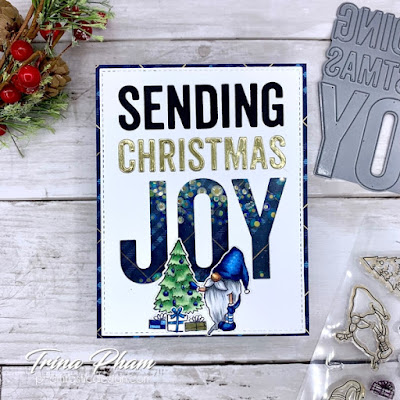
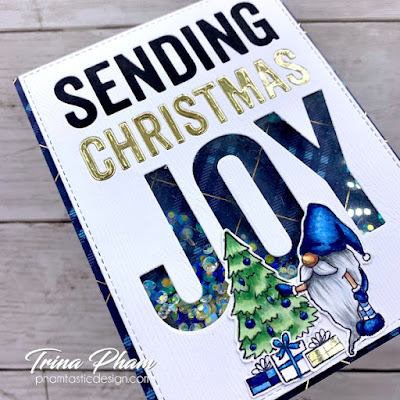
I said it before and I’ll say it again ๐Ÿ˜‚… I honestly don’t understand the fascination with gnomes, but they continue to be very popular. ๐Ÿค”   Anyway, I used my one and only gnome product - Merry Gnomes stamp set - from Jane’s Doodles to create a Christmas shaker card.


Started by selecting the Woodsy Plaid paper from Memory Box (MB) and trimming it to A2 size.  The blues with a bit of gold in the paper determined the colour scheme.  All the images were stamped with Memento Tuxedo Black ink onto Xpress It cardstock, coloured with Copic markers, then fussy cut out.  The gift on the right was paper pieced with MB gold Polished Foil paper.


The Sending Christmas Joy sentiment from My Favorite Things (MFT) was then die cut from a stitched 4”x5.25” Bristol panel.  Inlaid “sending” with black cardstock and “Christmas” with the same MB gold foil paper.  Joy was then backed with acetate for the shaker portion.  Used foam tape to create the well to house the shaker elements and to mount the panel onto a white card base to finish.  


I want to thank Jane and TMR team for having me guest design.  Hope you will join in with your masculine gnome card.  If you need more inspiration, check out what TMR team have made HERE.  Thank you for stopping by.  


Challenges:
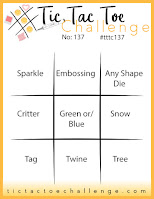
Tic Tac Toe - #137 challenge by Stef   (diagonal sparkle-blue/green-tree)

November 29, 2018

Winnie and Walter November 2018 Release - Day 3

Hello there!  I am super excited and honoured to be joining Winnie and Walter today for Day 3 of their November Release!  Shay already made my year by offering me the Leading Lady spot in October, so when I saw this invite, I was completely blown away!  Of course, I immediately accepted but soon was met with disappointment when our postal service in Canada began striking.  I knew I wouldn't receive the new products in time to participate.  But then legislation stepped in and our postal service was restored as of Tuesday.  There's a backlog of mail, so I still didn't think I was going to see any mail any time soon.  Well, I was happy to be wrong!  Low and behold... the stamps arrived yesterday afternoon!  I don't know when the dies will arrive, but I'm loving the stamps!

As the title states, I am jumping in on day 3 of the November Release.  If you missed out on what's happening, I've copied and pasted directly from their blog the links to the previous posts.  Check them out for numerous chances to win some amazing prizes!

To enter our November 2018 Release's The Big Giveaway CLICK HERE.
To enter to win Premiere Day No. 1 featured products CLICK HERE 
To enter to win Premiere Day No. 2 Featured Products...continue reading!
To enter to win Premiere Day No. 3 Featured Products CLICK HERE  (goes live at 7:00 a.m. CST on November 29, 2018)
To enter to win Premiere Day No. 4 Featured Products CLICK HERE (goes live at 7:00 a.m. CST on November 30, 2018)


CAS CHRISTAS

So I managed to create two Christmas cards for today using the adorable Snowy Holiday by Evelin T Designs stamp set.  First up is this CAS card.


On an A2 size panel trimmed from X-press It cardstock, stamped the puppy image with black Copic friendly ink, then coloured with Copics.  Heat embossed the sentiment next using VersaMark ink and clear embossing powder.


Masked the image and the top and bottom of the panel and ink blended Cracked Pistachio, Peacock Feathers and Mermaid Lagoon distress inks with a mini blending tool for the background.  Removed the masks and added snow with a white gel pen.  For some sparkle to finish, added clear shimmer to the star, red areas, hat brim and hat pom pom (unable to capture it).


SNOW GLOBE SHAKER

For my second card, it was meant to be another CAS card, but at the last minute, I decided to try my first flat shaker card.


Using the MISTI, stamped the snow globe with black Copic friendly ink on an A2 size panel of X-press It cardstock.  Masked the snow bank, then stamped the snowman.  Coloured in the images with Copics. This was when I decided to make my first flat shaker card, so I stamped the snow globe again on another A2 size panel of X-press It cardstock.  Cut out the snow globe glass area and coloured the snow globe base.  Heat embossed the sentiment with white embossing powder.


Now to put the shaker together.  Attached a piece of acetate to the back of the opening with strong double sided tape.  Added tape to the acetate creating a tight seal around the snow globe window where the shaker bits will be.  Placed the shaker bits in the middle of the first coloured piece with the snowman.  Removed the release paper from the adhesive, then sandwiched the shaker bits in between the two panels.  Trimmed the shaker panel down to 5" x 3.75", then mounted it to a navy blue card base to finish.  Using a stamp positioner makes this very easy.


That does it for me today!  To see more fabulous creations from the Talent at Winnie and Walter, head on over their blob HERE.  Join me for day 4 when all new release products will be available tomorrow night!  Than you for stopping by.


Challenges:

CAS Card
Make My Monday - #85 Non-Traditional Christmas Colours
Cupcake Inspirations - #459 The Holidays
Cardz 4 Guyz - #208 Christmas Critters
Creative Friday - #219 Clean and Simple
Watercooler Wednesday - #198 Gail's All About Holidays
Mod Squad - Use a Critter
Sweet Stampers - #26 Christmas


Shaker Card
Merry Little Christmas - #4 Anything Christmas Goes
Mix It Up - #19 Anything Goes + Aperture
Love to Craft - #28 November Anything Goes
Always Fun - Anything Goes

SSS Wednesday - Anything Goes